04 - Jenkins and Ansible
I will document a bit on how Jenkins and Ansible work with Matt Cloud endpoints.
- Introduction
- The Matt-Cloud Way
- Setting up Jenkins
- Making a Pipeline
- Ansible Basics
- Advanced Jenkins SSO
- Ansible Windows
Introduction
For the unfamiliar, Jenkins and Ansible are open-source projects for automation. Due to the way they are used in my experience, the distinction can be confusing, and it is important. Jenkins is a web-based application for executing long-running shell scripts on an endpoint, allowing the observation of the output of the shell scripts in the browser. Ansible is a linux program that runs various tasks on remote endpoints depending on the configured playbooks. Since Ansible playbooks can be thought of as long-running shell scripts, this makes sense to run from a Jenkins playbook. The Jenkins playbook can be created to collect the variables and set up the environment to run the Ansible playbook from.
When I first learned about these applications, we used Ansible playbooks running from Jenkins pipelines for automation. My initial motivation for learning how exactly this worked was just to de-mystify the process. Then, Microsoft announced Windows Recall, the built-in spyware that would eventually be included with all PCs that would record keystrokes and screenshots. This led me to dive deep into learning how to use Linux, and since my experience using Linux now included Ansible for automating endpoint deployment, I decided to use this with my own stuff. I have always been very confident with using Windows, but what I consider to be inexcusable privacy violations has led me to learning how to use Linux as a permanent replacement. In order to ensure a consistent platform to start from, I set up my own PXE server with a private SSH key and a few other preconfigured items. I set up a Jenkins server on Matt-Cloud and integrated it with Authelia. I set up an Ansible environment that I can view in a browser-based VS instance. I learned how to sync my Jenkinsfiles with Github and then how to pull the Pipelines from Github to allow for advanced pipelines.
The other main advantage to this is that it allows me to have a consistent platform for tinkering. To better explain this, let me compare this to how I used to use Linux. My old Linux systems were all one-off unique builds. I would often find myself with a working setup but poor records of how I achieved that. Now, if I do everything in Ansible, this means that I am always starting from the Matt-Cloud base image, then pushing out the project build as I'm working on it now. Once it's working, this means I have a permanently reproducible project, and I can build on it at any point and then just deploy my most recent changes to any currently working setups. This is a huge benefit of using Ansible in my opinion.
The other main use for Ansible and Jenkins is deploying my primary Linux workstation. I like to have my main Linux system be effectively ephemeral, meaning that all I need to create an identical system to what I am using now is run a specific playbook on a fresh Matt-Cloud base image. I have a pipeline to capture my profile that I run periodically, and this can be deployed as part of an Ansible playbook.
The Matt-Cloud Way
Introduction
This is effectively a copy of the Jenkins and Ansible article under The Nerdy Stuff. This provides an overview of how I have things set up in Matt-Cloud before getting into the specifics.
Jenkins Process
On my own Jenkins instance I use Github to sync my Pipelines with jenkinsfiles on my server, along with LDAP and OIDC for authentication which is way more complicated than a default Jenkins setup. You might have access; you can check your group membership at the Matt-Cloud Group page. Along with that, I use an open-source project to host all my pipelines and playbooks in a website, which itself is hosted behind my SSO. This is not something anyone but me has access to due to how insecure the access is. It is full write access to all files without any knowledge of the connected user. It works by effectively hosting files that live on a Linux system in the browser. I have that running in a docker container, with the paths of the ansible playbooks and jenkins pipelines in it so they can all be viewed and edited in the browser. I also have my code-server container customized so I can sync my github from the built-in terminal in the browser. Github lets me easily sync the Jenkinsfiles between the filesystem and Jenkins itself. Jenkins itself is configured in the browser, so the Docker settings for Jenkins are only a dozen lines or so of mostly volumes. Here are some screenshots of my stuff
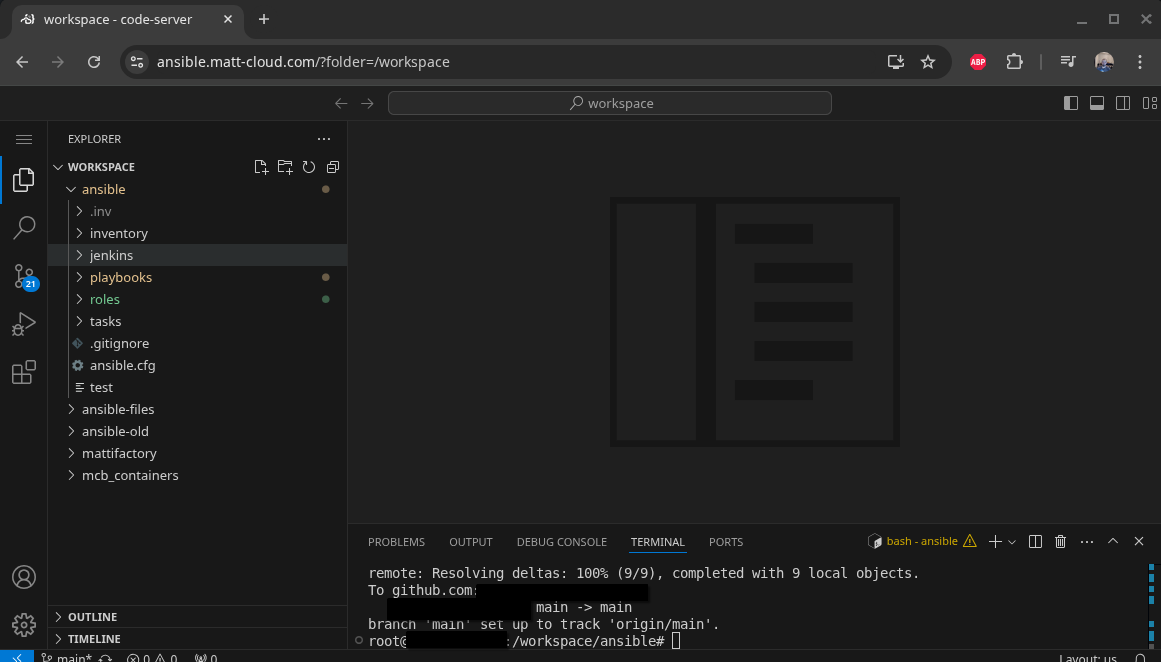
Ansible/Jenkins Code Server
Jenkins Home Page

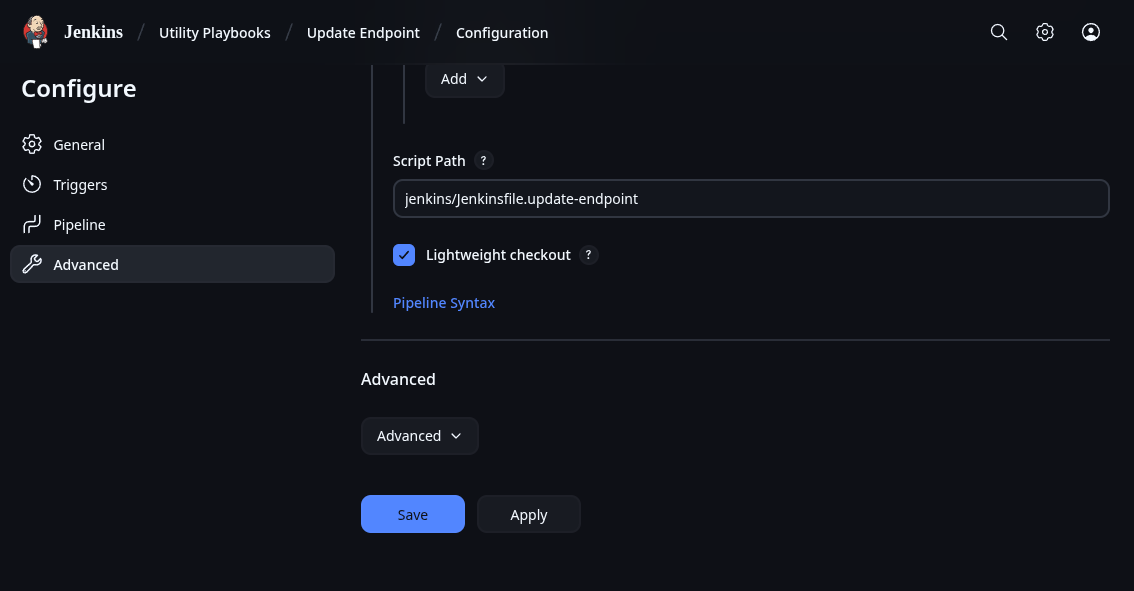
Sample Pipeline Config
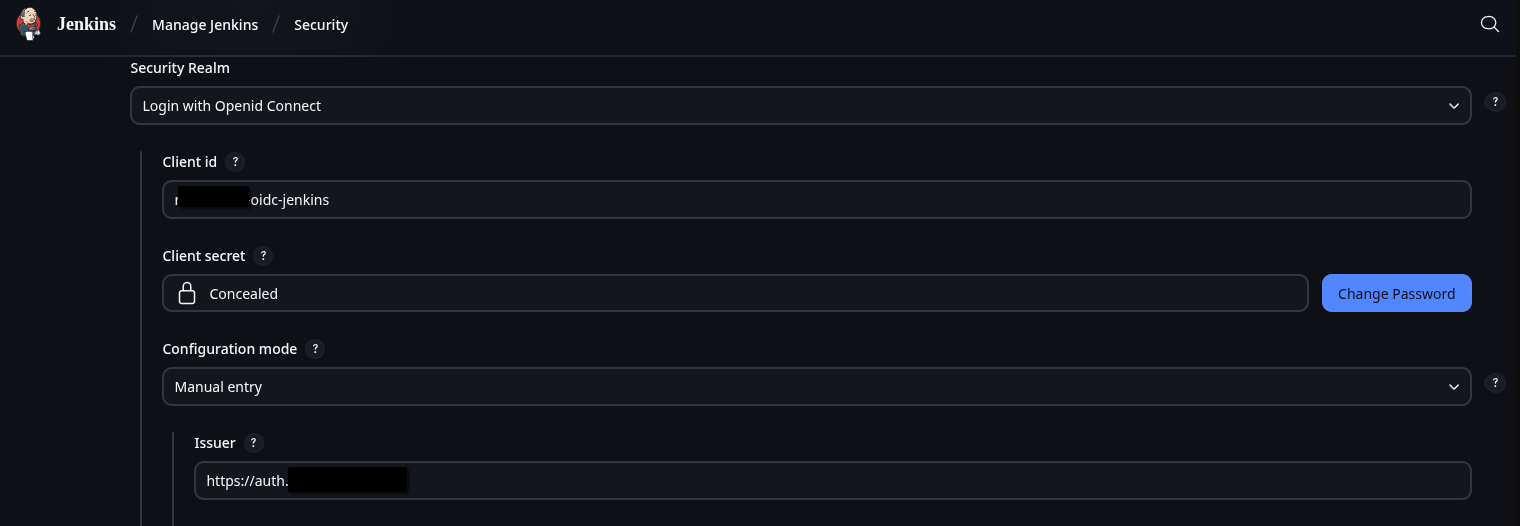
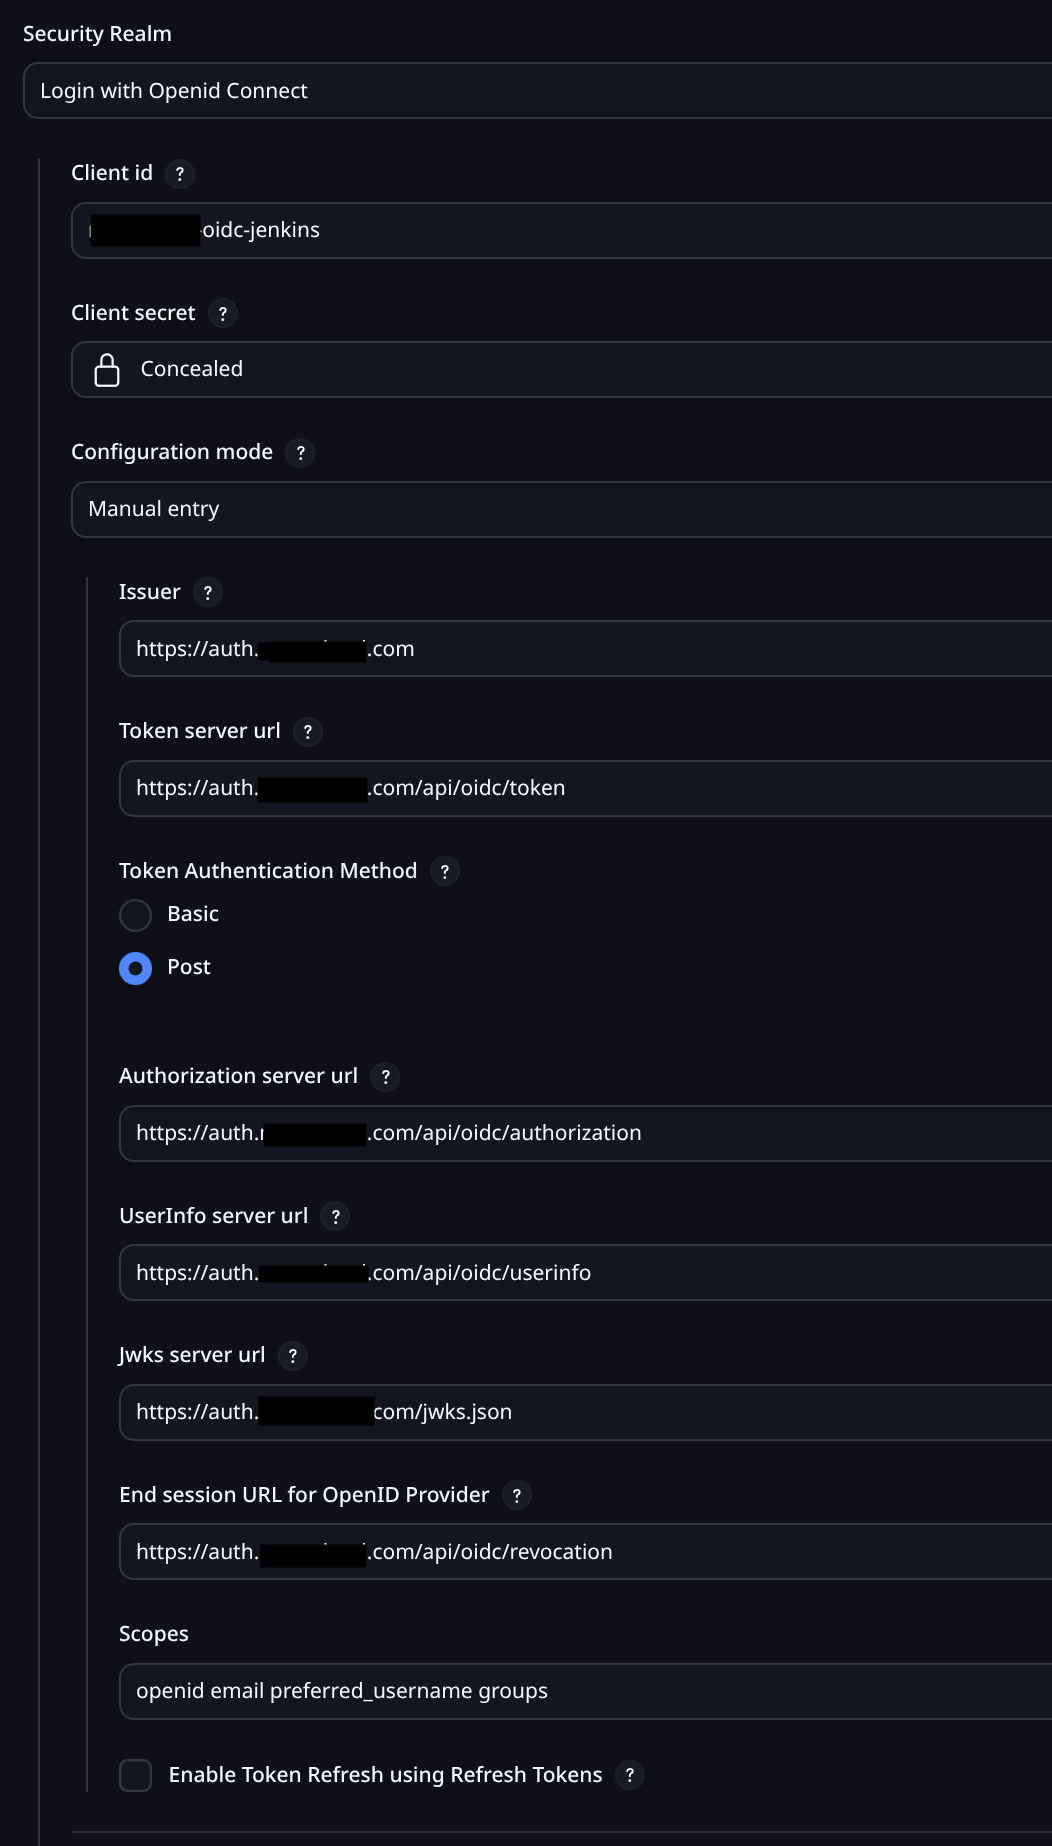
Some OIDC Config and Security Settings
Let me start with my own Jenkins. I have recently shared my jenkinsfiles on my Gitea instance. To show how this works I will use the update-endpoint pipeline I have as an example. Most of my pipelines have the same stages of Generate Inventory File, Ansible Playbook, and Remove Inventory File. Once you have Jenkins up and running, and have stored your needed keys, you should be ready to run Ansible. The biggest thing is to make sure the SSH key is accessible. I will include the code for a dynamic inventory file generator here. This makes it obvious how Ansible authenticates. Since the inventory file is intended to be an inventory, it can be used to run the same playbook on multiple hosts.
Inventory File Generation
inventory.sh
#!/bin/bash
# Dynamic inventory generation script ansible
# Function to display usage
usage() {
echo "Usage: $0 -i IP_LIST -u JENKINS_USER -g JENKINS_GROUP [-a SERVER_SUBNET_GROUP] [-s] [-v] [-e]"
echo "Options:"
echo " -i IP_LIST Comma-separated list of IPs. Will not fail if blank, but why 0_o"
echo " -u JENKINS_USER Jenkins user"
echo " -g JENKINS_GROUP Jenkins primary group"
echo " -a SERVER_SUBNET_GROUP Jenkins group for SSH access, need to pass something when called"
echo " -q Be quieter"
echo " -s Set variable to true if more than one IP is passed"
echo " -v Display Ansible Version"
exit 1
}
# Initialize variables with default values
skip=false
more_than_one=false
display_version=false
allsubnet_group=missing
be_quiet=false
# Parse command line options
while getopts ":i:u:g:a:svq" opt; do
case ${opt} in
i ) # process option i
IP_LIST=$OPTARG
;;
u ) # process option u
JENKINS_USER=$OPTARG
;;
g ) # process option g
JENKINS_GROUP=$OPTARG
;;
s ) # process option s
skip=true
;;
v ) # process option v
display_version=true
;;
q ) # process option q
be_quiet=true
;;
a ) # process option a
allsubnet_group=$OPTARG
;;
\? ) usage
;;
esac
done
shift $((OPTIND -1))
# Check if all required options are provided
if [ -z "$JENKINS_USER" ] || [ -z "$JENKINS_GROUP" ]; then
usage
fi
if $display_version; then
if ! $be_quiet; then
echo "Showing ansible version"
ansible --version
fi
fi
# Generate an 8-character hash from the IP list
hash=$(echo -n "$IP_LIST" | md5sum | cut -c 1-8)
if ! $be_quiet; then
echo "IP List:"
echo $IP_LIST
echo $hash
fi
# Define the inventory file path with the hash
inventory_file="/var/jenkins_home/ansible/.inv/inventory-$hash.yml"
if $skip; then
IFS=',' read -ra IPS <<< "$IP_LIST"
if [ ${#IPS[@]} -gt 1 ]; then
more_than_one=true
fi
fi
if $skip; then
if ! $be_quiet; then
echo "Single host option set"
fi
if $more_than_one; then
if ! $be_quiet; then
echo "IP list provided, inventory will be emptied"
fi
IP_LIST=""
fi
fi
# Initialize the YAML inventory content
inventory_content="---
all:
hosts:
"
# Loop through each IP in the comma-separated list
IFS=',' read -ra IPS <<< "$IP_LIST"
for IP in "${IPS[@]}"; do
ip_check=$(curl -s http://172.25.100.15:15010/ip_check?ip=${IP} | jq .in_subnets)
# if this is a restricted subnet, then check the group
if $ip_check; then
if ! $be_quiet; then
echo "Subnet restricted, checking group membership"
fi
if [ "$allsubnet_group" == "$SERVER_SUBNET_GROUP" ]; then
if ! $be_quiet; then
echo "IP Check Passed, adding endpoint ${IP} to inventory"
fi
inventory_content+=" ${IP}:
ansible_host: ${IP}
"
else
if ! $be_quiet; then
echo "Warning: User ${JENKINS_USER} not member of ${SERVER_SUBNET_GROUP}!"
echo "Auth Check Failed for endpoint ${IP}, not adding to inventory"
fi
fi
# if the subnet is not restricted, just add the endpoint to the inventory
else
if ! $be_quiet; then
echo "Unrestricted subnet, adding endpoint ${IP} to inventory"
fi
inventory_content+=" ${IP}:
ansible_host: ${IP}
"
fi
done
inventory_content+=" vars:
ansible_connection: ssh
ansible_ssh_private_key_file: /var/jenkins_home/jenkins_key
ansible_python_interpreter: /usr/bin/python3
jenkins_user: '${JENKINS_USER}'
jenkins_group: '${JENKINS_GROUP}'
subnet_group_check: '${allsubnet_group}'
SERVER_SUBNET_GROUP: '${SERVER_SUBNET_GROUP}'
"
# Write the inventory content to the file
echo "$inventory_content" > $inventory_file
# echo inventory
if ! $be_quiet; then
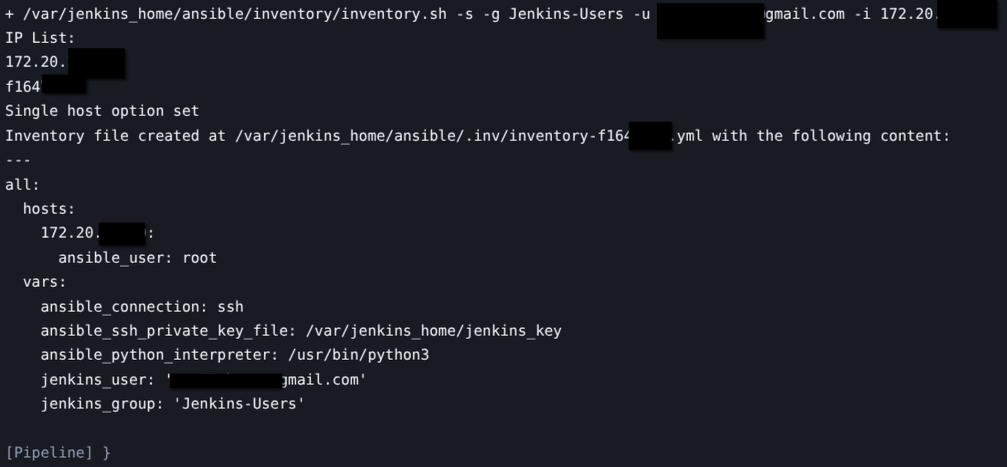
echo "Inventory file created at $inventory_file with the following content:"
cat $inventory_file
fi
This script outputs something like this depending on the flags that are set. This screenshot is also from an older version of the inventory script.
After generating the inventory file, Ansible can just be ran by calling the playbook for the inventory. When you pick apart the Jenkinsfiles, the critical portion is this bit.
ansible-playbook -i \$inventory_file \/var/jenkins_home/ansible/playbooks/update-endpoint.yaml --ssh-common-args='-o StrictHostKeyChecking=no'Setting up Jenkins
The first step in getting this working is getting Jenkins up. I run Jenkins in a Docker container, and have it integrated with my SSO, which is a more complicated setup than you need, but this is the Matt-Cloud documentation, not the bare-minimum documentation, so here we go. It is still a bit less that what all I have and configuration-anonymized, but it should be enough to get the point across. The important bit is that the location on the docker host /media/docker/jenkins/ansible is where your ansible files will all live. If you want these to be a different volume or part of a backup or whatever, you can do as you will. You can also set up you own Github account so you can upload your eventual Jenkinsfiles to Github and then sync Jenkins with Github to get advanced Jenkinsfiles. There are ways you can be even more advanced including running the ansible jobs from within a docker container, but I have not gone down that rabbit hole. The important part is that all your Ansible role files are reachable from the Jenkins container, and having them also set up in that VS in the browser container makes editing your Ansible files easier. I think that at work the Ansible files are checked out from Github and stuffed into a docker container to run, but that is way less necessary than just getting the Jenkinsfiles into a place where Jenkins can check them out before a run.
I am also including samples of the Authelia permission and SSO settings in case you really want full-send a copy of your own Matt-Cloud. The giant on whom's SSO shoulders I stand is this rando site called Ibracorp. It looks like they yanked their original walkthrough I used for my own Authelia, but I have my own documentation that might even be thorough enough to copy.

Dockerfile.matt-code
This is the container for the VS code environment; I just have my github keys added to it so I can do that from the built-in terminal.
# # Use the official Python image from the Docker Hub
# FROM python:3.11

# Starting with code-server now
FROM lscr.io/linuxserver/code-server:latest

# Set the working directory
WORKDIR /workspace

# Install git & ssh
RUN apt-get update && \
    apt-get install -y git && \
    apt-get clean

# Grab SSH key pair
RUN mkdir /root/.ssh
COPY ./ssh-keys/id_rsa /root/.ssh/id_rsa
COPY ./ssh-keys/id_rsa.pub /root/.ssh/id_rsa.pub
COPY ./ssh-keys/id_matt /root/.ssh/id_matt
COPY ./ssh-keys/id_matt.pub /root/.ssh/id_matt.pub

# Secure SSH keys
RUN chmod 600 /root/.ssh/id_rsa
RUN chmod 600 /root/.ssh/id_rsa.pub
RUN chmod 600 /root/.ssh/id_matt
RUN chmod 600 /root/.ssh/id_matt.pub
RUN touch /root/.ssh/config && \
    \echo "Host *\n\tStrictHostKeyChecking no\n" >> /root/.ssh/config

# Run some updates and install some stuff
RUN apt-get update && \
    apt-get install -y python3 python3-pip python3-venv php-cli php-common && \
    apt-get clean
# RUN cp /bin/python3 /bin/python
RUN ln -s /usr/bin/python3 /usr/bin/python

# Set up Git user information
RUN git config --global user.name "github_username" && \
    git config --global user.email "github_email@domain.com" && \
    git config --global init.defaultBranch "main"

# Add a script to keep the container running (optional, useful for development)
CMD ["tail", "-f", "/dev/null"]
Dockerfile.matt-jenkins-new
This is the Dockerfile for the Jenkins container I use. I wanted things like ping for troubleshooting and of course I needed ansible.
# Start with the latest official Jenkins image
FROM jenkins/jenkins:lts

# Switch to the root user to install packages
USER root

# Install prereq packages
RUN apt-get update && \
apt-get install -y python3-pip python3-venv iputils-ping net-tools nano sshpass sqlite3 && \
apt-get clean && \
rm -rf /var/lib/apt/lists/*

# Install ansible with python
# Create a virtual environment
RUN python3 -m venv /home/jenkins/venv
# Activate the virtual environment
ENV PATH "/home/jenkins/venv/bin:$PATH"
# Upgrade pip within the virtual environment
RUN pip install --upgrade pip
RUN pip install passlib
# Install the latest version of Ansible using pip
RUN pip install ansible

# Install ansible plugins
RUN ansible-galaxy collection install \
community.crypto \
community.general \
community.docker

# Switch back to the Jenkins user
USER jenkins

# Expose necessary ports
EXPOSE 8080
EXPOSE 50000

# Define the default command to run Jenkins
CMD ["bash", "-c", "jenkins-plugin-cli --list && exec java -jar /usr/share/jenkins/jenkins.war"]
docker-compose.yaml
# docker-compose.yaml
services:

  jenkins:
    hostname: jenkins
    image: matt-jenkins-new
    container_name: jenkins
    privileged: true
    user: root
    ports:
     - 8080:8080
    volumes:
      - /media/docker/jenkins/jenkins-config/:/var/jenkins_home # this is for jenkins configs
      - /media/docker/jenkins/ansible:/var/jenkins_home/ansible  # put your ansible file structure here
    restart: always
    networks:
      - net

  ansible:
    image: matt-code
    container_name: ansible
    ports:
      - 8443:8443
    environment:
      - PUID=0
      - PGID=0
      - TZ=America/Los_Angeles
      - PROXY_DOMAIN=https://ansible.domain.com
      - DEFAULT_WORKSPACE=/workspace
    volumes:
      - ansible-config:/config
      - /media/docker/jenkins/ansible-old:/workspace/ansible-old
      - /media/docker/jenkins/ansible:/workspace/ansible
    restart: always
    networks:
      - net

volumes:
  ansible-config:
    driver: local # Define the driver and options under the volume name
    driver_opts:
      type: none
      device: /media/docker/jenkins/ansible-config
      o: bind

networks:
  net:
    driver: bridge
    ipam:
      driver: default
      config:
        -
          subnet: 10.10.0.0/24
Authelia SSO Config Sample
These are the pertinent portions of the Authelia config file.
# Permissions
    # Jenkins Auth Tree
    - domain:
        - "jenkins.domain.com"
      resources:
        - "/securityRealm/finishLogin"
      policy: bypass

    - domain:
        - "jenkins.domain.com"
      subject:
        - "group:Jenkins-Admin"
        - "group:Jenkins-Users"
      policy: two_factor

    - domain:
        - "jenkins.domain.com"
      subject:
        - "group:Jenkins-View"
      policy: one_factor

# SSO Portion
      - id: oidc-jenkins
        client_name: "Jenkins"
        description: SSO-Account
        secret: 'deadbeefloldeadbeeflol'
        sector_identifier: 'auth.domain.com'
        public: false
        authorization_policy: one_factor
        require_pkce: false
        consent_mode: implicit
        pre_configured_consent_duration: 6m
        audience: []
        scopes:
          - openid
          - groups
          - email
          - profile
          - name
          - preferred_username
        redirect_uris:
          - https://jenkins.domain.com/login/oauth2/code/authelia
          - https://jenkins.domain.com/
          - https://jenkins.domain.com/securityRealm/finishLogin
          - https://jenkins.domain.com/securityRealm
          - https://jenkins.domain.com/accounts/authelia/login/callback
        grant_types:
          - refresh_token
          - authorization_code
          - implicit
        response_types:
          - code
          - token
          - id_token
        response_modes:
          - form_post
          - query
          - fragment
          - jwt
        userinfo_signing_algorithm: none
        token_endpoint_auth_method: 'client_secret_post'
Making a Pipeline
Assuming you have the container running, you should be able to set up a playbook. Before this, you should set up the link with Github. I don't remember exactly how I did that either, so I found a guide. Turns out it's easy to checkout, it was the part about the Repo needing credentials that was hard. I remember it took a little while to get the Github SSH keys all set up, but now that I have them it's trivial. Here is an old playbook I wrote before learning how to use Ansible to set up my first PXE server. Since this was before I figured out Ansible, I was just using Jenkins to automate my shell commands. Once I learned how to use Ansible, I abandoned this way of using Jenkins. I haven't ran this pipeline in a long time, but I believe it did work in the end.
Jenkinsfile.old_pxe
pipeline {
    agent any


    environment {
        DEBIAN_IP = 'debian_machine_ip'
        SSH_CREDENTIALS_ID = 'jenkins-ssh-key'
        PXE_AUTH = 'PXE_AUTH'
    }


    stages {


        stage('Install Packages') {
            steps {
                script {
                    sshagent([env.SSH_CREDENTIALS_ID]) {
                        sh """
                        ssh-keygen -f "/root/.ssh/known_hosts" -R "${params.host_ip}"
                        ssh -o StrictHostKeyChecking=no root@${params.host_ip} << EOF
                            echo "samba-common samba-common/workgroup string  WORKGROUP" | debconf-set-selections
                            echo "samba-common samba-common/dhcp boolean true" | debconf-set-selections
                            echo "samba-common samba-common/do_debconf boolean true" | debconf-set-selections
                            apt update --yes
                            apt upgrade --yes
                            apt install --yes isc-dhcp-server curl jq tftpd-hpa apache2 syslinux-common net-tools samba pwgen cifs-utils unzip

                        """
                    }
                }
            }
        }


        stage('Configure DHCP Server') {
            steps {
                withCredentials([string(credentialsId: env.PXE_AUTH, variable: 'PXE_AUTH')]) {
                    sshagent([env.SSH_CREDENTIALS_ID]) {
                        sh """
                        ssh -o StrictHostKeyChecking=no root@${params.host_ip} << EOF
                            systemctl stop isc-dhcp-server
                            curl -o /etc/dhcp/dhcpd.conf -L https://$PXE_AUTH@mattifactory.com/dhcp/dhcpd.conf
                            curl -o /etc/default/isc-dhcp-server -L https://$PXE_AUTH@mattifactory.com/dhcp/isc-dhcp-server
                            systemctl start isc-dhcp-server
                        """
                    }
                }
            }
        }


        stage('Configure TFTP Server') {
            steps {
                withCredentials([string(credentialsId: env.PXE_AUTH, variable: 'PXE_AUTH')]) {
                    sshagent([env.SSH_CREDENTIALS_ID]) {
                        sh """
                        ssh -o StrictHostKeyChecking=no root@${params.host_ip} << EOF
                            systemctl stop tftpd-hpa
                            mkdir -p /srv/tftp
                            chown -R tftp:tftp /srv/tftp
                            chmod -R 777 /srv/tftp
                            curl -o /etc/default/tftpd-hpa -L https://$PXE_AUTH@mattifactory.com/dhcp/tftpd-hpa
                            systemctl start tftpd-hpa
                        """
                    }
                }
            }
        }


        stage('Configure HTTP Server') {
            steps {
                withCredentials([string(credentialsId: env.PXE_AUTH, variable: 'PXE_AUTH')]) {
                    sshagent([env.SSH_CREDENTIALS_ID]) {
                        sh """
                        ssh -o StrictHostKeyChecking=no root@${params.host_ip} << EOF
                            systemctl stop apache2
                            mkdir -p /var/www/html/debian-installer/amd64
                            cd /var/www/html/debian-installer/amd64
                            wget -q https://$PXE_AUTH@mattifactory.com/dhcp/netboot.tar.gz
                            tar -xzf netboot.tar.gz
                            systemctl start apache2
                        """
                    }
                }
            }
        }


        stage('Configure PXE Boot Configuration') {
            steps {
                withCredentials([string(credentialsId: env.PXE_AUTH, variable: 'PXE_AUTH')]) {
                    sshagent([env.SSH_CREDENTIALS_ID]) {
                        sh """
                        ssh -o StrictHostKeyChecking=no root@${params.host_ip} << EOF
                            cp /var/www/html/debian-installer/amd64/pxelinux.0 /srv/tftp/
                            cp /usr/lib/syslinux/modules/bios/* /srv/tftp/
                            cp -R /var/www/html/debian-installer/amd64/debian-installer /srv/tftp/
                            mkdir -p /srv/tftp/pxelinux.cfg
                            curl -o /srv/tftp/debian-installer/amd64/linux -L https://$PXE_AUTH@mattifactory.com/dhcp/linux
                            curl -o /srv/tftp/debian-installer/amd64/initrd.gz -L https://$PXE_AUTH@mattifactory.com/dhcp/initrd.gz
                            curl -o /srv/tftp/debian-installer/amd64/pxelinux.cfg/default -L https://$PXE_AUTH@mattifactory.com/dhcp/default
                            curl -o /srv/tftp/pxelinux.cfg/default -L https://$PXE_AUTH@mattifactory.com/dhcp/default
                            curl -o /srv/tftp/debian-installer/amd64/pxelinux.cfg/default -L https://$PXE_AUTH@mattifactory.com/dhcp/default
                            curl -o /srv/tftp/debian-installer/amd64/grub/grub.cfg -L https://$PXE_AUTH@mattifactory.com/dhcp/grub.cfg
                            curl -o /var/www/html/preseed.cfg -L https://$PXE_AUTH@mattifactory.com/dhcp/preseed.cfg
                            curl -o /srv/tftp/preseed.cfg -L https://$PXE_AUTH@mattifactory.com/dhcp/preseed.cfg
                        """
                    }
                }
            }
        }


        stage('Configure SMB & Hostname & Reboot') {
            steps {
                withCredentials([string(credentialsId: env.PXE_AUTH, variable: 'PXE_AUTH')]) {
                    sshagent([env.SSH_CREDENTIALS_ID]) {
                        sh """
                        ssh -o StrictHostKeyChecking=no root@${params.host_ip} << EOF
                            mkdir -p /media/share
                            chmod 777 /media/share
                            systemctl stop smbd.service
                            curl -o /etc/samba/smb.conf -L https://$PXE_AUTH@mattifactory.com/smb/smb.conf
                            systemctl start smbd.service
                            echo cosmos-pxe > /etc/hostname
                            echo 127.0.0.1 cosmos-pxe >> /etc/hosts
                            sleep 2
                            reboot now

                        """
                    }
                }
            }
        }
    }
}
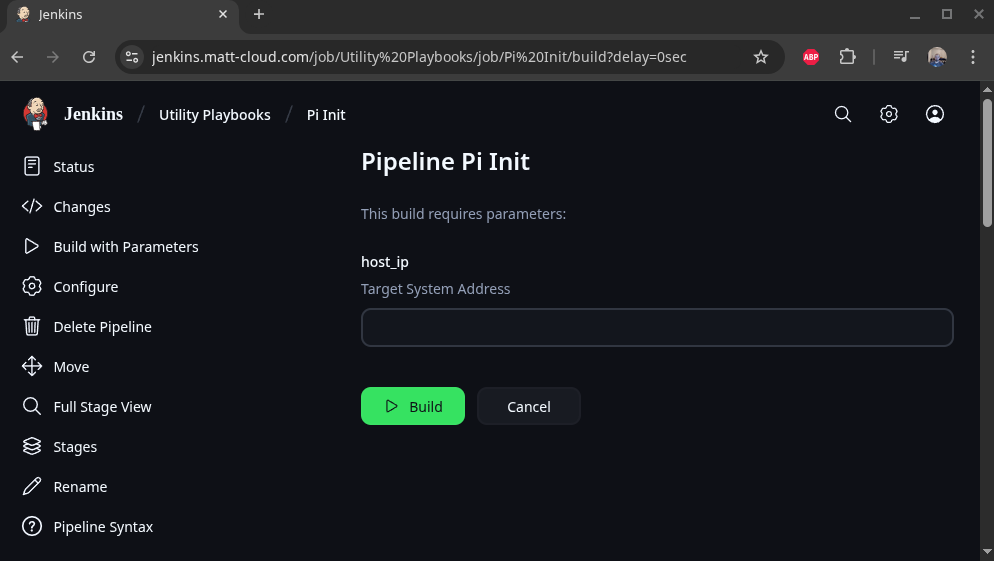
With that old example of how to use Jenkins without Ansible behind us, here is a simple Jenkisfile that first injects the Ansible SSH key into a new NanoPi Device and runs a super simple playbook. Ansible requires an inventory file; assuming you're not actually keeping an Ansible inventory file, then you need to generate an inventory file. This is usually done by script ran in the Jenkinsfile. This inventory.sh script takes a list of IPs and creates an inventory file that ansible-playbook can read among other things. This is less important than what the Jenkinsfile shows; specifically this shows how to run commands with variables, how the SSH key works, and how to run a very simply Ansible playbook.
I recently updated the dynamic inventory generation script to have a few more options for passing user and group, as well as prohibiting lists of endpoints. This is because I want to open my Jenkins up a bit, and I don't want people running pipelines on my servers. It did make the script a lot more complicated.
Jenkinsfile
pipeline {
    agent any

    // Define parameters
    parameters {
        string(name: 'host_ip', description: 'Target System Address')
    }

    environment {
        ANSIBLE_FORCE_COLOR = '1'
        jenkins_public_key = credentials('jenkins_public_key')
    }

    options {
        ansiColor('xterm')
    }

    stages {

        stage('Inject Auth Key') {
            steps {
                script{
                    // clear ssh keys
                    echo "Target IP: ${params.host_ip}"

                    sh """
                    ssh-keygen -f "/root/.ssh/known_hosts" -R "${params.host_ip}"
                    """

                    sh """
                    echo Copy public key to pi home dir
                    sshpass -p 'pi' ssh -o StrictHostKeyChecking=no pi@${params.host_ip} "echo ${env.jenkins_public_key} > /home/pi/authorized_keys"
                    """

                    sh """
                    echo Make sure /root/.ssh exists
                    sshpass -p 'pi' ssh -o StrictHostKeyChecking=no pi@${params.host_ip} "echo pi | sudo -S mkdir -p /root/.ssh/"
                    """

                    sh """
                    echo Move public key to root
                    sshpass -p 'pi' ssh -o StrictHostKeyChecking=no pi@${params.host_ip} "echo pi | sudo -S mv /home/pi/authorized_keys /root/.ssh/authorized_keys"
                    """

                    sh """
                    echo Restrict permissions on file
                    sshpass -p 'pi' ssh -o StrictHostKeyChecking=no pi@${params.host_ip} "echo pi | sudo -S chmod -R 600 /root/.ssh/"
                    """

                    sh """
                    echo Set owner to root
                    sshpass -p 'pi' ssh -o StrictHostKeyChecking=no pi@${params.host_ip} "echo pi | sudo -S chown -R root:root /root/.ssh/"
                    """
                }
            }
        }

        stage('Generate Inventory File') {
            steps {
                // Generate the dynamic inventory file
                sh """
                jenkins_group=\$(echo ${env.BUILD_USER_GROUPS} |  sed 's/,/\\n/g' | grep Jenkins | head -n 1)
                jenkins_user=\$(echo ${env.BUILD_USER})
                cd /var/jenkins_home/ansible
                chmod +x /var/jenkins_home/ansible/inventory/inventory.sh
                /var/jenkins_home/ansible/inventory/inventory.sh -s -g \$jenkins_group -u \$jenkins_user -i ${params.host_ip}

                """
            }
        }

        stage('Ansible Check') {
            steps {
                sh """
                echo ${params.host_ip}
                hash=\$(echo -n ${params.host_ip} | md5sum | cut -c 1-8)
                inventory_file="/var/jenkins_home/ansible/.inv/inventory-\$hash.yml"

                cd /var/jenkins_home/ansible

                ansible-playbook -i \$inventory_file \
                    /var/jenkins_home/ansible/playbooks/pi-init.yaml --ssh-common-args='-o StrictHostKeyChecking=no'

                """
            }
        }

    }


    post {
        always {
            // Remove dynamic Inventory file
            sh """
            hash=\$(echo -n "${params.host_ip}" | md5sum | cut -c 1-8)
            inventory_file="/var/jenkins_home/ansible/.inv/inventory-\$hash.yml"
            rm \$inventory_file

            """
        }
    }

}
pi-init.yaml
---
- name: Ansible Test
  hosts: all
  become: yes

  # this is meant just as a tiny playbook to run after the public key is injected with jenkins
  tasks:
  # Check System Architecture
  - name: Check CPU Arch
    shell: "dpkg --print-architecture"
    register: cpu_architecture_output

  - name: Display cpu_architecture_output variable
    debug:
      msg: "{{ cpu_architecture_output.stdout_lines[0] }}"

...
inventory.sh
#!/bin/bash

# Dynamic inventory generation script ansible

# Function to display usage
usage() {
    echo "Usage: $0 -i IP_LIST -u JENKINS_USER -g JENKINS_GROUP [-s] [-v]"
    echo "Options:"
    echo "  -i IP_LIST       Comma-separated list of IPs"
    echo "  -u JENKINS_USER  Jenkins user for SSH access"
    echo "  -g JENKINS_GROUP Jenkins group for SSH access"
    echo "  -s               Set variable to true if more than one IP is passed"
    echo "  -v               Display Ansible Version"
    exit 1
}

# Initialize variables with default values
skip=false
more_than_one=false
display_version=false

# Parse command line options
while getopts ":i:u:g:sv" opt; do
  case ${opt} in
    i ) # process option i
        IP_LIST=$OPTARG
        ;;
    u ) # process option u
        JENKINS_USER=$OPTARG
        ;;
    g ) # process option g
        JENKINS_GROUP=$OPTARG
        ;;
    s ) # process option s
        skip=true
        ;;
    v ) # process option v
        display_version=true
        ;;
    \? ) usage
        ;;
  esac
done
shift $((OPTIND -1))
# Check if all required options are provided
if [ -z "$IP_LIST" ] || [ -z "$JENKINS_USER" ] || [ -z "$JENKINS_GROUP" ]; then
    usage
fi

if $display_version; then
    echo "Showing ansible version"
    ansible --version
fi

# Generate an 8-character hash from the IP list
hash=$(echo -n "$IP_LIST" | md5sum | cut -c 1-8)
echo "IP List:"
echo $IP_LIST
echo $hash

# Define the inventory file path with the hash
inventory_file="/var/jenkins_home/ansible/.inv/inventory-$hash.yml"

if $skip; then
    IFS=',' read -ra IPS <<< "$IP_LIST"
    if [ ${#IPS[@]} -gt 1 ]; then
        more_than_one=true
    fi
fi

if $skip; then
    echo "Single host option set"
    if $more_than_one; then
        echo "IP list provided, inventory will be emptied"
        IP_LIST=""
    fi
fi

# Initialize the YAML inventory content
inventory_content="---
all:
  hosts:
"

# Loop through each IP in the comma-separated list
IFS=',' read -ra IPS <<< "$IP_LIST"
for IP in "${IPS[@]}"; do
    inventory_content+="    ${IP}:
      ansible_user: root
"
done

inventory_content+="  vars:
    ansible_connection: ssh
    ansible_ssh_private_key_file: /var/jenkins_home/jenkins_key
    ansible_python_interpreter: /usr/bin/python3
    jenkins_user: '${JENKINS_USER}'
    jenkins_group: '${JENKINS_GROUP}'
"

# Write the inventory content to the file
echo "$inventory_content" > $inventory_file

echo "Inventory file created at $inventory_file with the following content:"
cat $inventory_file
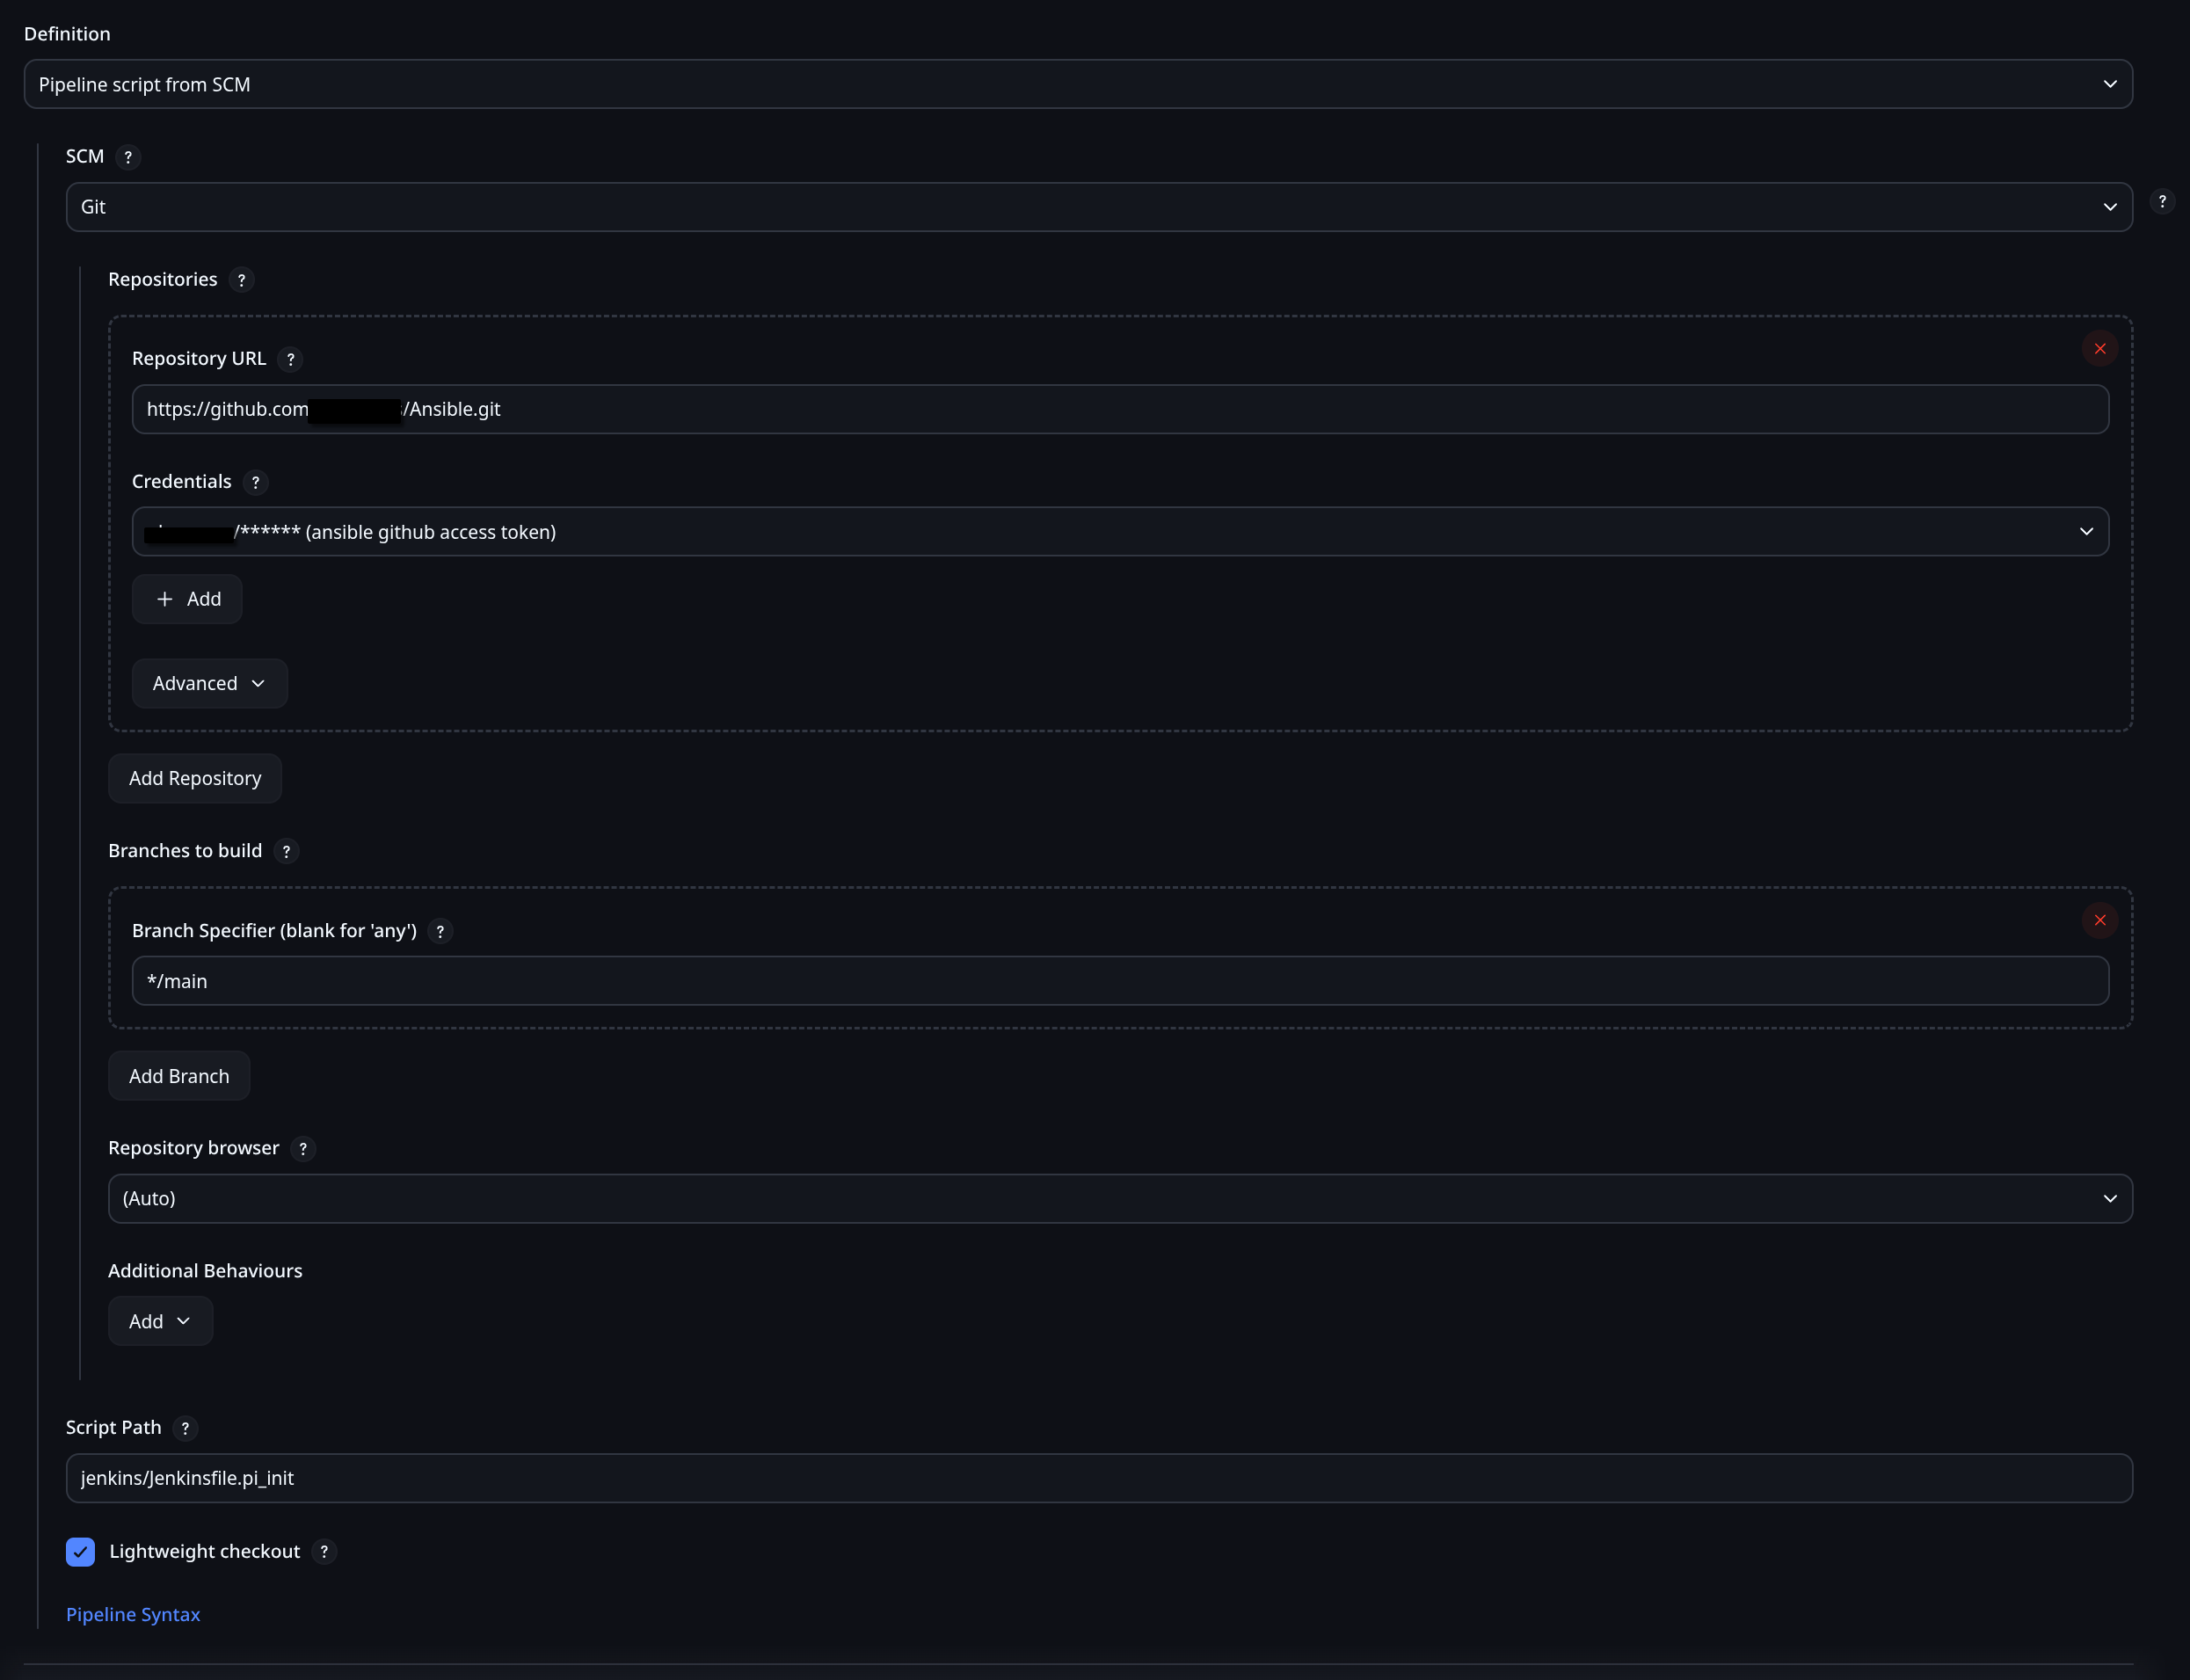
This is how to configure this to pull from Github:


Ansible Basics
Ansible Overview
Ansible runs Playbooks, which are either simple lists of Tasks or lists of full Roles, which themselves are sets of Task lists. The different tasks that are available are all documented online, and are of such variety that you can do just about anything with them. The Tasks are configured with YAML which makes them easy to read. Variables are configured with Jinja formatting, and the output of tasks can be stored as variables. Variables can also be passed from the command and the inventory file.
Since Ansible is a program, it needs to be installed, and it needs to run in a compatible environment. In larger deployments Ansible might be called from within its own Docker container, but since Matt-Cloud is small, I just customize my Jenkins container to install the latest Ansible build as well as several plugins. This means that the ansible-playbook command is running inside my Jenkins Docker container. I mentioned this in an earlier page and included the Dockerfile for my Jenkins.
In the Making a Pipeline page example, the pi-init.yaml playbook is a very simple list of Tasks. A more complex but still simple list of tasks is a playbook I have for uprgading Debian Bookworm to Trixie. This Playbook doesn't require any Files or Templates or Variables, so it works just fine with being a simple list of Tasks.
trixie_upgrade.yaml
---

# lifted from here
# https://gist.github.com/yorickdowne/3cecc7b424ce241b173510e36754af47

- name: Trixie Upgrade Pipeline
  hosts: all
  become: yes

  tasks:

  - name: Get distribution version
    setup:
      filter: ansible_distribution*

  - name: Skip if not Debian 12
    meta: end_host
    when: ansible_distribution != 'Debian' or ansible_distribution_major_version != '12'

  - name: apt clean
    apt:
      clean: yes

  - name: Get filesystem facts
    setup:
      filter: ansible_mounts

  - name: Fail if free space on / is below 5 GiB
    ansible.builtin.assert:
      that:
        - item.size_available > (5 * 1024 * 1024 * 1024)
      fail_msg: "Free disk space on {{ item.mount }} is below 5 GiB"
    loop: "{{ ansible_mounts }}"
    when: item.mount == "/"

  - name: Perform apt upgrade
    apt:
      upgrade: dist
      update_cache: yes

  - name: Perform apt autoremove
    apt:
      autoremove: yes

  - name: Perform apt clean
    apt:
      clean: yes

  - name: Check if reboot required
    ansible.builtin.stat:
      path: /run/reboot-required
      get_checksum: no
    register: reboot_required_file

  - name: Reboot if required
    ansible.builtin.reboot:
      msg: "Reboot initiated by Ansible"
      connect_timeout: 5
      reboot_timeout: 600
      pre_reboot_delay: 0
      post_reboot_delay: 60
      test_command: whoami
    when: reboot_required_file.stat.exists

  - name: Update OS in sources.list
    ansible.builtin.replace:
      path: /etc/apt/sources.list
      regexp: 'bookworm'
      replace: 'trixie'

  - name: Find all 3rd-party repos
    ansible.builtin.find:
      paths: /etc/apt/sources.list.d
      patterns: '*'
      recurse: no
    register: third_party_repos

  - name: Switch 3rd-party repos from bookworm to trixie
    ansible.builtin.replace:
      path: "{{ item.path }}"
      regexp: 'bookworm'
      replace: 'trixie'
    loop: "{{ third_party_repos.files }}"
    loop_control:
      label: "{{ item.path }}"

  - name: Perform apt upgrade, moving to Trixie
    apt:
      upgrade: dist
      update_cache: yes

  - name: Get distribution version
    setup:
      filter: ansible_distribution*

  - name: Fail if not Debian 13
    assert:
      that:
        - ansible_distribution_major_version == '13'
      fail_msg: "Upgrade to Debian 13 failed"

  - name: Perform apt autoremove
    apt:
      autoremove: yes

  - name: Perform apt clean
    apt:
      clean: yes

  - name: Reboot to trixie
    ansible.builtin.reboot:
      msg: "Reboot initiated by Ansible"
      connect_timeout: 5
      reboot_timeout: 600
      pre_reboot_delay: 0
      post_reboot_delay: 60
      test_command: whoami

  - name: Modernize apt sources
    ansible.builtin.command:
      cmd: apt -y modernize-sources

...
A role-based Playbook looks simpler, but that simplicity hides a lot of complexity and modularity behind it. As an example, here is the cosmos-server playbook. It runs four Roles, and then two more Tasks, one of which loads a fifth Role. Because of the file structure of Ansible, I don't need to put the full paths to all these files. You can also find these files in my gitea; cosmos-server.yaml and Jenkinsfile.cosmos-server.
cosmos-server.yaml
---
- name: Cosmos Server Pipeline
  hosts: all
  become: yes
  vars:
    # this is for the pxe-server special role
    iso_only: true

  roles:
    - role: cosmos_init
      when: not refresh_special | bool

    - role: docker_workstation
      when: install_docker | bool and not refresh_special | bool

    - role: nvidia_drivers
      when: install_nvidia | bool  and not refresh_special | bool and not skip_nvidia | bool

    - role: ldap_client
      when: install_LDAP | bool  and not refresh_special | bool

  tasks:

    - name: display special_server
      debug:
        msg: "{{ special_server }}"

    - name: Run the appropriate role based on server type
      include_role:
        name: "{{ special_server }}"
      when: '"none" not in special_server'

...
Jenkinsfile.cosmos-server
pipeline {
    agent any

    // Define parameters
    parameters {
        string(name: 'host_ip', description: 'Target System Address')
        string(name: 'new_hostname', description: 'Update Hostname')
        booleanParam(name: 'rename_endpoint', defaultValue: true, description: 'Uncheck to skip renaming of endpoint')
        booleanParam(name: 'add_domain', defaultValue: true, description: 'When checked hostname will have home.cosmos appended')
        // reference for later
        // choice(name: 'DEPLOY_ENV', choices: ['dev', 'staging', 'prod'], description: 'Environment to deploy to')
        booleanParam(name: 'install_docker', defaultValue: true, description: 'When checked docker packages are installed and portainer started on 9100')
        booleanParam(name: 'install_LDAP', defaultValue: false, description: 'When checked LDAP integration is installed with NSLCD')
        // this now needs to have the case sensitive name of the role to run
        choice(name: 'special_server', choices: ['none', 'octoprint', 'kodi', 'timelapse', 'pxe_server', 'jenkins_vpn', 'net_bridge', 'carputer', 'video_capture'], description: 'Choose special server install if desired')
        booleanParam(name: 'refresh_special', defaultValue: false, description: 'When checked only the special server step is run')
        booleanParam(name: 'no_vpn', defaultValue: false, description: 'Check this option to remove default cosmos VPN')
        booleanParam(name: 'public_deploy', defaultValue: true, description: 'Uncheck this option to deploy private SSH key')
        booleanParam(name: 'onboard_pi', defaultValue: false, description: 'Check this option to onboard a new FriendlyElec Device')
        booleanParam(name: 'install_python', defaultValue: false, description: 'Check this option to install python packages')
        booleanParam(name: 'skip_nvidia', defaultValue: false, description: 'Check this option to skip nvidia driver install')
    }

    environment {
        ANSIBLE_FORCE_COLOR = '1'
        SATURN_BEHEMOTH = credentials('SATURN_BEHEMOTH')
        APPS_LIST = 'cosmos-base'
        LINUX_LDAP_PWD = credentials('LINUX_LDAP')
        pxe_proxy_password = credentials('pxe_proxy_password')
        PXE_API_KEY = credentials('PXE_API_KEY')
        matt_public_key = credentials('matt_public_key')
        matt_private_key = credentials('matt_private_key')
        cosmos_password = credentials('cosmos_password')
        cosmos_root_password = credentials('cosmos_root_password')
        jenkins_public_key = credentials('jenkins_public_key')
        tesla_api_key = credentials('tesla_api_key')
    }

    options {
        ansiColor('xterm')
    }

    stages {

        stage('Inject Auth Key') {
            when {
              expression { params.onboard_pi }
            }
            steps {
                script{
                    // clear ssh keys
                    echo "Target IP: ${params.host_ip}"

                    sh """
                    ssh-keygen -f "/root/.ssh/known_hosts" -R "${params.host_ip}"
                    """

                }

                script{
                    sh """
                    echo Copy public key to pi home dir
                    sshpass -p 'pi' ssh -o StrictHostKeyChecking=no pi@${params.host_ip} "echo ${env.jenkins_public_key} > /home/pi/authorized_keys"

                    """
                }

                script{
                    sh """
                    echo Make sure /root/.ssh exists
                    sshpass -p 'pi' ssh -o StrictHostKeyChecking=no pi@${params.host_ip} "echo pi | sudo -S mkdir -p /root/.ssh/"
                                        """
                }

                script{
                    sh """
                    echo Move public key to root
                    sshpass -p 'pi' ssh -o StrictHostKeyChecking=no pi@${params.host_ip} "echo pi | sudo -S mv /home/pi/authorized_keys /root/.ssh/authorized_keys"

                    """
                }

                script{
                    sh """
                    echo Restrict permissions on file
                    sshpass -p 'pi' ssh -o StrictHostKeyChecking=no pi@${params.host_ip} "echo pi | sudo -S chmod -R 600 /root/.ssh/"

                    """
                }

                script{
                    sh """
                    echo Set owner to root
                    sshpass -p 'pi' ssh -o StrictHostKeyChecking=no pi@${params.host_ip} "echo pi | sudo -S chown -R root:root /root/.ssh/"

                    """
                }
            }
        }


        stage('Generate Inventory File') {
            steps {
                // Generate the dynamic inventory file
                sh """
                cd /var/jenkins_home/ansible
                chmod +x /var/jenkins_home/ansible/inventory/inventory.sh
                /var/jenkins_home/ansible/inventory/inventory.sh ${params.host_ip}

                """
            }
        }

        stage('Ansible Playbook') {
            steps {
                //Run the cosmos-base ansible playbook
                // /workspace/ansible/playbooks/cosmos-base.yaml
                sh """
                echo ${params.host_ip}
                hash=\$(echo -n ${params.host_ip} | md5sum | cut -c 1-8)
                inventory_file="/var/jenkins_home/ansible/.inv/inventory-\$hash.yml"

                cd /var/jenkins_home/ansible

                ansible-playbook -i \$inventory_file \
                    /var/jenkins_home/ansible/playbooks/cosmos-server.yaml --ssh-common-args='-o StrictHostKeyChecking=no' \
                    --extra-vars "new_hostname=${params.new_hostname} saturn_behemoth=${SATURN_BEHEMOTH} \
                                  docker_full=false rename_host=${params.rename_endpoint} onboard_pi=${params.onboard_pi} \
                                  linux_ldap_pwd=${LINUX_LDAP_PWD} install_docker=${params.install_docker} \
                                  install_LDAP=${params.install_LDAP} special_server='${params.special_server}' \
                                  refresh_special=${params.refresh_special} pxe_proxy_password=${pxe_proxy_password} \
                                  PXE_API_KEY=${PXE_API_KEY} no_vpn=${params.no_vpn} add_domain=${params.add_domain} \
                                  matt_public_key='${env.matt_public_key}' matt_private_key='${env.matt_private_key}' \
                                  cosmos_password='${env.cosmos_password}' cosmos_root_password='${env.cosmos_root_password}' \
                                  tesla_api_key='${tesla_api_key}' public_deploy=${params.public_deploy} \
                                  install_python=${params.install_python} skip_nvidia=${params.skip_nvidia} "

                """
            }
        }
    }

    post {
        always {
            // Remove dynamic Inventory file
            sh """
            hash=\$(echo -n "${params.host_ip}" | md5sum | cut -c 1-8)
            inventory_file="/var/jenkins_home/ansible/.inv/inventory-\$hash.yml"
            rm \$inventory_file

            """
        }
    }

}
I have put a lot of my Ansible code up on my Personal Github, so I'll share some links here. Most of my Github is public, but if you can read this you can also probably SSO into my Github.
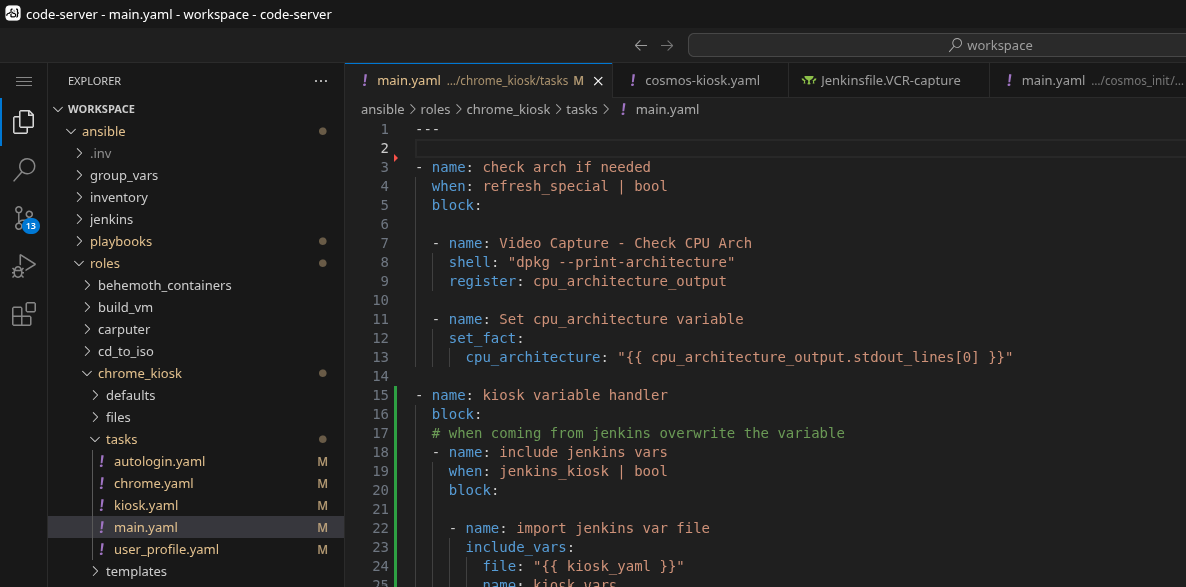
The end result of how I set up my own Ansible structure and the docker containers I run is that I get a SSO-protected VS Code instance in the browser with all my stuff in it. The container is even smart enough to know about the Github changes, thus the amber highlighting on the filenames in the tree. Note the file structure here; the jenkins and playbooks folders are the source of the two complimentary named Github repos above.
Inventory File?
Ansible requires an inventory file. This is a consequence of how any why Ansible was designed. Ansible was intended to have a single inventory file and a control node, and the control node would periodically run playbooks agains hosts from the inventory file. We don't do that here. Instead of a control node, I have Jenkins initiate an Ansible playbook by dynamically creating an inventory file. Ansible is a command that is run with an argument for the playbook file and the inventory file. Since I don't maintain an inventory file, this needs to be dynamically generated on the fly. It bears mentioning that the inventory file is, in fact, a file that is stored on my Jenkins server and has to be deleted, which is the last thing the Jenkinsfile does. Since I run all my playbooks from within the Jenkins server, that means the inventory files are stored here while the playbooks run, and then deleted when finished. I can also use the inventory file to pass certain variables from Jenkins, though I also do this with the ansible-playbook command.
Advanced Jenkins SSO
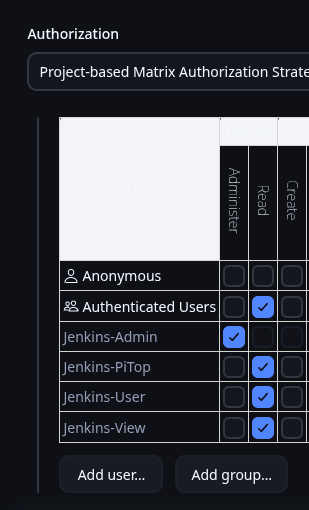
I use the OIDC plugin in Jenkins to use my Authelia SSO for login and permission management based on AD LDAP groups. I am including some screenshots of the permissions matrix and the config page below. The hard part is getting Authelia working in the first place. Once that is working, adding new sources is usually pretty straightforward depending on my own requirements. Sometimes I set personal requirements that make things harder on me, but that's fine. Jenkins was pretty easy to get going. There is enough in this knowledgebase to get Authelia going if you are dedicated.
My Jenkins Homepage under my test account: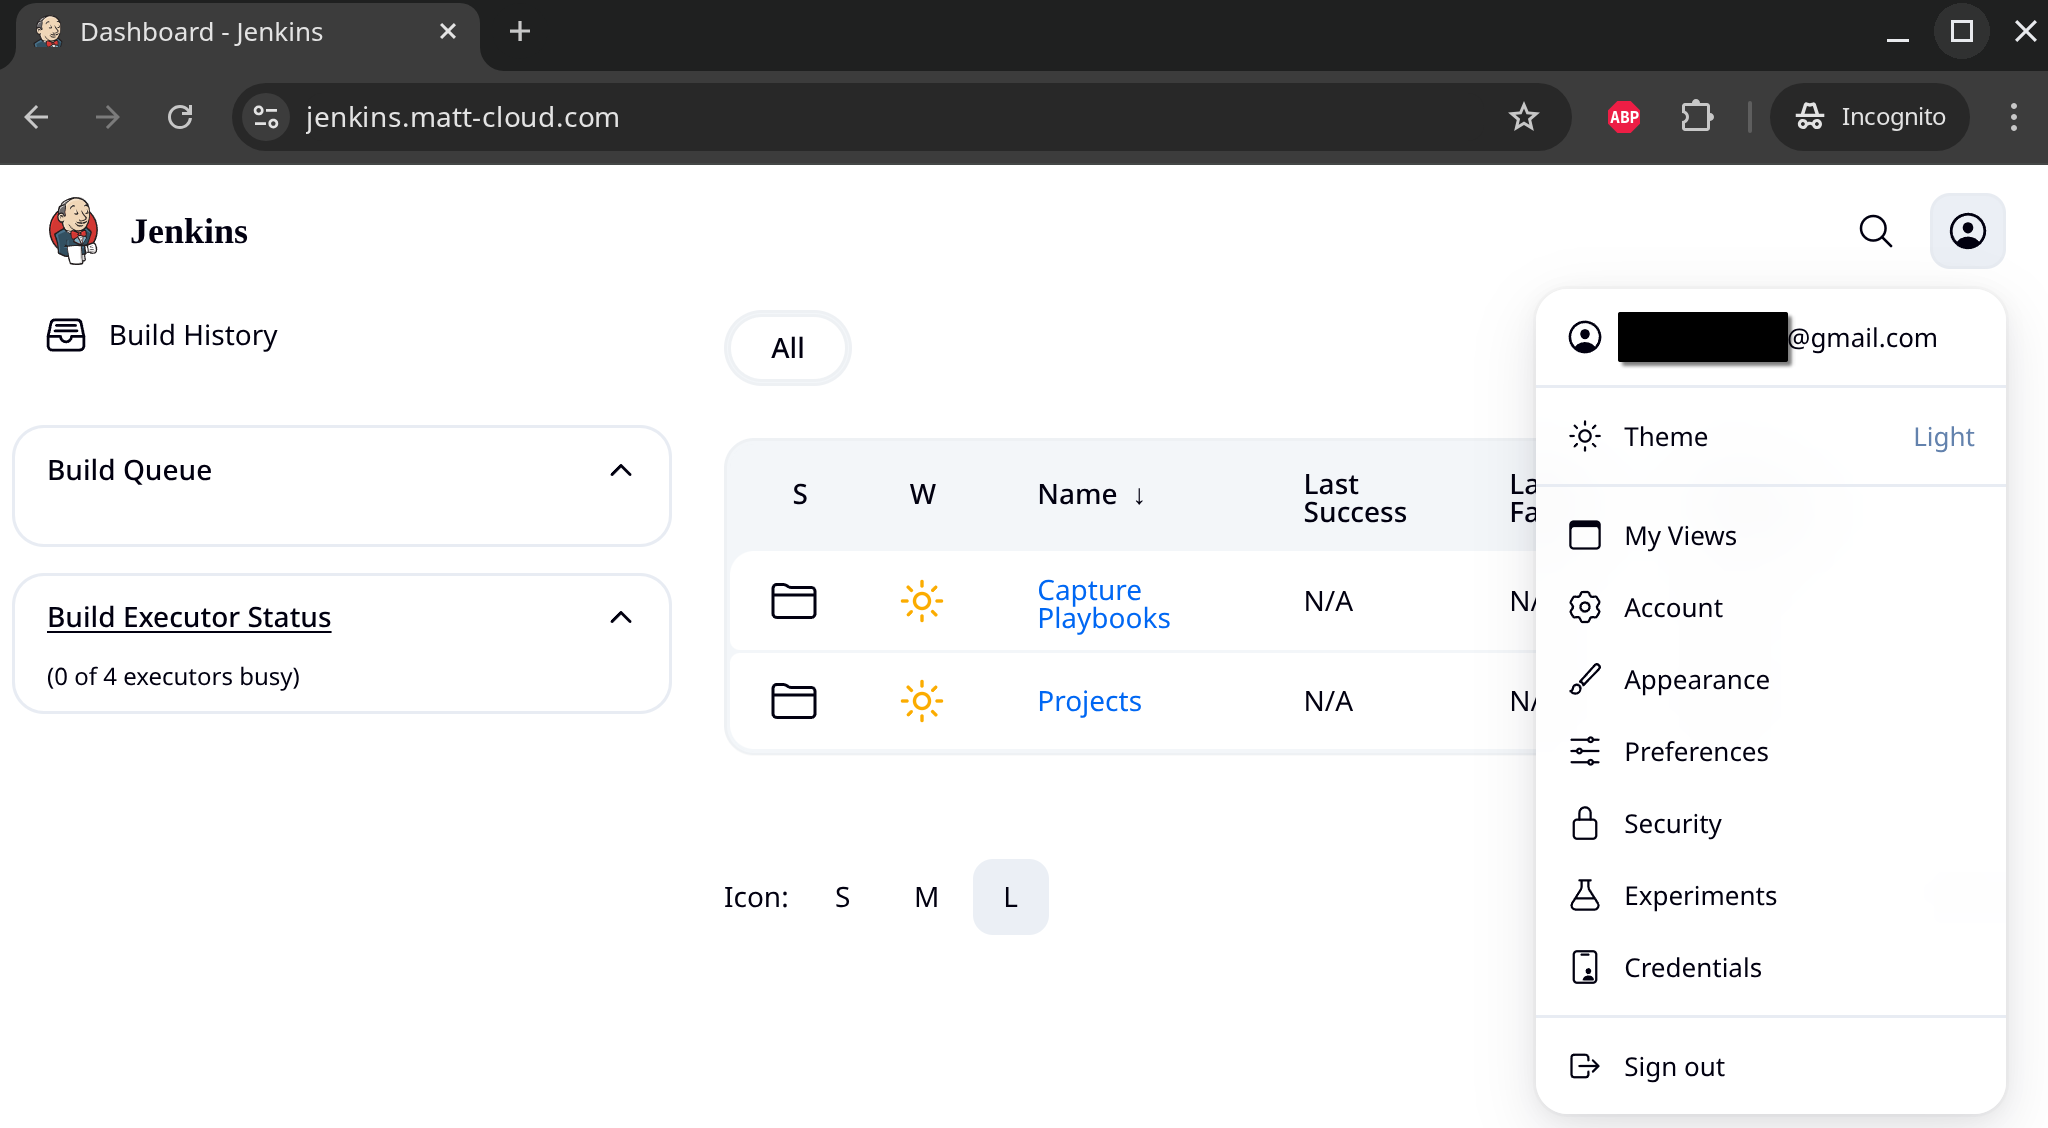
OIDC Plugin Config:
Permission Matrix: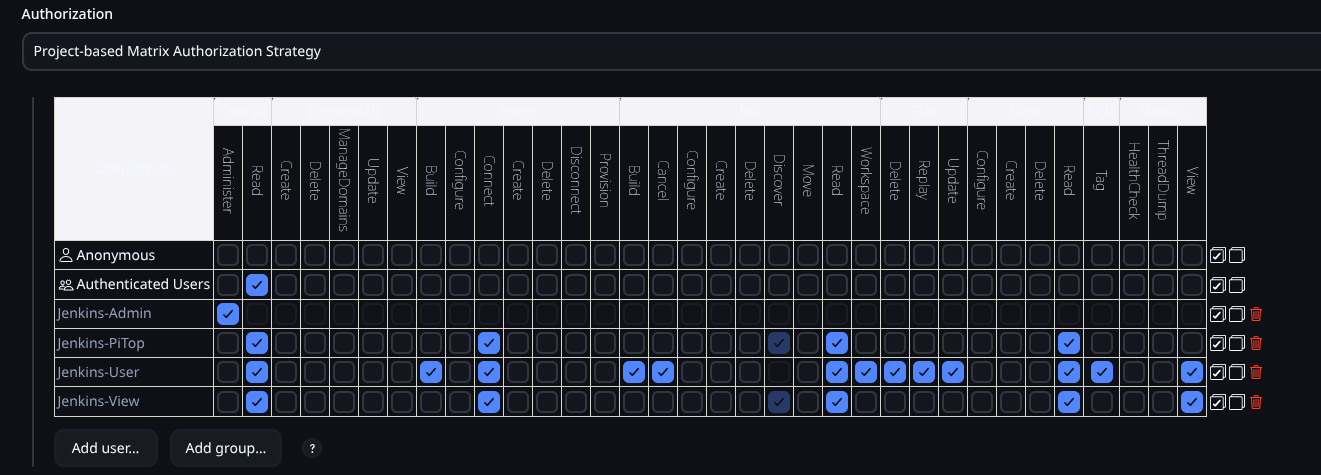
Ansible Windows
Running Ansible on Windows requires WinRM to be configured, and it requires one of several different authentication options. In real environments this is typically done with HTTPS certs, but since there is no Matt-Cloud Infosec, I can just use a username and password. Furthermore, since I don't have a secure password vault, I have done some creative stuff with the registry to get this done. Group policy used to allow for creating a local account with a specific password, but that feature has been depreciated. I have used Group Policy to have a user account be created, and then a startup script will run cosmosrm.ps1 to set the password based on a registry key.
cosmosrm.ps1
# script for setting ansible service account to registry key
$username = "cosmos-ansible"
$ansible_registry = "HKLM:\SOFTWARE\Cosmos\Ansible"
$password_key = "Password"
$password = (Get-ItemProperty $ansible_registry).$password_key

# This is what the thing needs to set the password
$securePassword = ConvertTo-SecureString $password -AsPlainText -Force

# Set password
$UserAccount = Get-LocalUser -Name $username
$UserAccount | Set-LocalUser -Password $securePassword

# Make it a local admin
Add-LocalGroupMember -Group "Administrators" -Member $username

# Various Ansible Settings
Set-Item -Path WSMan:\localhost\Service\Auth\Basic -Value $true
Enable-WSManCredSSP -Role Server -Force
The same password is in Jenkins, and the dynamic inventory file generator script adds the password to the inventory file. Like I said, not super secure, but it works.
inventory.sh
#!/bin/bash

# Dynamic inventory generation script ansible windows

# Function to display usage
usage() {
    echo "Windows Ansible Dynamic Inventory File Generation Script"
    echo "Usage: $0 -i IP_LIST -u JENKINS_USER -g JENKINS_GROUP -w WINDOWS_USER -p ANSIBLE_PASSWORD [-a SERVER_SUBNET_GROUP] [-s] [-v] [-e]"
    echo "Options:"
    echo "  -i IP_LIST                  Comma-separated list of IPs. Will not fail if blank, but why 0_o"
    echo "  -u JENKINS_USER             Jenkins user"
    echo "  -g JENKINS_GROUP            Jenkins primary group"
    echo "  -a SERVER_SUBNET_GROUP      Jenkins group for SSH access, need to pass something when called"
    echo "  -w WINDOWS_USER             Windows user"
    echo "  -p ANSIBLE_PASSWORD         Password for the service account (Windows user)"
    echo "  -q                          Be quieter"
    echo "  -s                          Set variable to true if more than one IP is passed"
    echo "  -v                          Display Ansible Version"
    exit 1
}

# Initialize variables with default values
skip=false
more_than_one=false
display_version=false
allsubnet_group=missing
be_quiet=false

# Parse command line options
while getopts ":i:u:w:p:g:a:svq" opt; do
  case ${opt} in
    i ) # process option i
        IP_LIST=$OPTARG
        ;;
    u ) # process option u
        JENKINS_USER=$OPTARG
        ;;
    w ) # process option w
        WINDOWS_USER=$OPTARG
        ;;
    p ) # process option p
        ANSIBLE_PASSWORD=$OPTARG
        ;;
    g ) # process option g
        JENKINS_GROUP=$OPTARG
        ;;
    s ) # process option s
        skip=true
        ;;
    v ) # process option v
        display_version=true
        ;;
    q ) # process option q
        be_quiet=true
        ;;
    a ) # process option a
        allsubnet_group=$OPTARG
        ;;
    \? ) usage
        ;;
  esac
done
shift $((OPTIND -1))
# Check if all required options are provided
if [ -z "$JENKINS_USER" ] || [ -z "$JENKINS_GROUP" ] || [ -z "$WINDOWS_USER" ] || [ -z "$ANSIBLE_PASSWORD" ]; then
    usage
fi

if $display_version; then
    if ! $be_quiet; then
        echo "Showing ansible version"
        ansible --version
    fi
fi

# Generate an 8-character hash from the IP list
hash=$(echo -n "$IP_LIST" | md5sum | cut -c 1-8)

if ! $be_quiet; then
    echo "IP List:"
    echo $IP_LIST
    echo $hash
fi


# Define the inventory file path with the hash
inventory_file="/var/jenkins_home/ansible-windows/.inv/inventory-$hash.yml"

if $skip; then
    IFS=',' read -ra IPS <<< "$IP_LIST"
    if [ ${#IPS[@]} -gt 1 ]; then
        more_than_one=true
    fi
fi

if $skip; then
    if ! $be_quiet; then
        echo "Single host option set"
    fi
    if $more_than_one; then
        if ! $be_quiet; then
            echo "IP list provided, inventory will be emptied"
        fi
        IP_LIST=""
    fi
fi

# Initialize the YAML inventory content
inventory_content="---
all:
  hosts:
"

# Loop through each IP in the comma-separated list
# skip if restricted user and subnet
IFS=',' read -ra IPS <<< "$IP_LIST"
for IP in "${IPS[@]}"; do
    ip_check=$(curl -s http://172.25.100.15:15010/ip_check?ip=${IP} | jq .in_subnets)
    # if this is a restricted subnet, then check the group
    if $ip_check; then
        if ! $be_quiet; then
            echo "Subnet restricted, checking group membership"
        fi
        if [ "$allsubnet_group" == "$SERVER_SUBNET_GROUP" ]; then
            if ! $be_quiet; then
                echo "IP Check Passed, adding endpoint ${IP} to inventory"
            fi
            inventory_content+="    ${IP}:
      ansible_host: ${IP}

"
        else
            if ! $be_quiet; then
                echo "Warning: User ${JENKINS_USER} not member of ${SERVER_SUBNET_GROUP}!"
                echo "Auth Check Failed for endpoint ${IP}, not adding to inventory"
            fi
        fi
    # if the subnet is not restricted, just add the endpoint to the inventory
    else
        if ! $be_quiet; then
            echo "Unrestricted subnet, adding endpoint ${IP} to inventory"
        fi
        inventory_content+="    ${IP}:
      ansible_host: ${IP}
"
    fi
done

inventory_content+="  vars:
    # windows user info
    ansible_user: ${WINDOWS_USER}
    ansible_password: '${ANSIBLE_PASSWORD}'
    ansible_become_user: ${WINDOWS_USER}
    ansible_become_pass: '${ANSIBLE_PASSWORD}'

    # ansible connection info
    ansible_connection: winrm
    ansible_winrm_transport: basic
    ansible_winrm_server_cert_validation: ignore
    ansible_winrm_scheme: http
    ansible_winrm_port: 5985

    # jenkins user info
    jenkins_user: '${JENKINS_USER}'
    jenkins_group: '${JENKINS_GROUP}'
    subnet_group_check: '${allsubnet_group}'
    SERVER_SUBNET_GROUP: '${SERVER_SUBNET_GROUP}'

    # other variables
    ansible_python_interpreter: /usr/bin/python3
"

# Write the inventory content to the file
echo "$inventory_content" > $inventory_file

# secure inventory file
if ! $be_quiet; then
    echo "Securing inventory file"
fi
chmod 700 $inventory_file

# echo inventory
if ! $be_quiet; then
    echo "Inventory file created at $inventory_file with the following content:"
    cat $inventory_file
fi
My primary motivation for this is so I can easily deploy the SSD Health Checker. This is done, so I am happy.
https://gitea.matt-cloud.com/matt/ansible-windows
https://jenkins.matt-cloud.com/job/Cosmos%20Windows/job/Disk%20API/
https://gitea.matt-cloud.com/matt/ansible-windows/src/branch/main/roles/storage_api
Now that it is complete, it means I have the platform and can do whatever with it now. I think this might be a good way to make a non-domain joined W11 computer de-fuckified if I ever need to be able to do that. For this, I would need a bigger powershell script and a different way to pull the password. This is just in general a good way to manage windows outside of AD, and building the infra was the biggest hurdle. Now that I have it, whipping out more playbooks is not a horribly complicated thing.