02 - The Nerdy Stuff
This book covers some of the more technical details on how I've built out my cloud.
- Intro
- From Internal Ports to External Domain
- Virtualization and Docker
- Jenkins and Ansible
- SSO Details
- MattGPT
- Matt-Cloud Drive
- Matt-Cloud Media
- Gitea
- Proxy Server
- Photo Album
- Network Infrastructure
Intro
I thought I'd make a general overview of some of my stuff here too for the curious. I think I have things secured adequately to describe how things are configured. I have copied over some of my config files for some of the service with sensitive info removed. If anyone has any requests for a howto gimme an email.
There is a lot of stuff that hasn't been true since moving to Joe's, I just forgot about updating this, whoopsie-doodle. I'll work on this later cause it's currently bedtime.
From Internal Ports to External Domain
Intro
It recently occurred to me that most people don't actually know how to plumb the great internet pipes from one end to the other. To me this stuff is pretty simple and straightforward. That's a Matt bias there, my bad y'all. At the risk of being patronizing, I will be thorough in my explanations here.
Domain Registrar
Let me start by talking about how a public domain works, since not everyone has purchased a domain before. I once, long ago, selected GoDaddy, so I have stayed there, though this is not an endorsement of them. Anyway, here's a sample test domain called testy-cal.com, nothing inappropriate about that at all, no sir, just a test domain in California, yup. Once you have purchased a domain, you need to find the place in the registrar's website where you can edit DNS. This is what it looks like for GoDaddy:
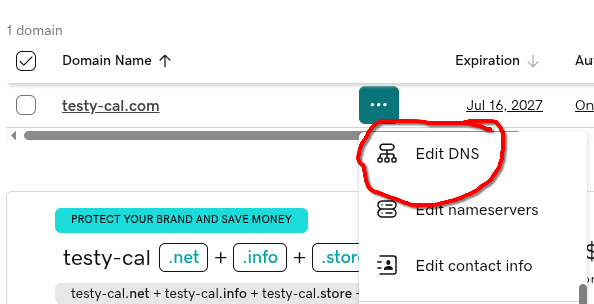
From there, you can assign all DNS records for your domain. For matt-cloud.com, this all points to the external IP address that I have assigned for this function. Here is an example of that for Matt-Cloud. This is some of the primary wizardry needed to get a website going. This flow here allows anyone in the world that puts matt-cloud.com into their web browser to get directed over to my little home at Joe's.

In order for things like kb.matt-cloud.com or auth.matt-cloud.com or all the other stuff to also resolve to an IP, I either have to set up each one, one-at-a-time, or set up a catchall record. The catchall record is a beautiful thing because I am lazy and don't wanna deal with all that shite. This is what the Matt-Cloud catchall record looks like. This just means that *.matt-cloud.com will redirect to the root page IP address unless I configure a different record on GoDaddy to overwrite this. Super easy stuff, but if you don't know then it's a mystery, right?

External IP Address
This is something that bears some text. All internet connections have an external IP address somewhere. At the risk of insulting your intelligence, here's an overview of how that works on a typical home cable internet connection. You get your physical gateway from Comcast, and that has an external IP address on Comcast's network somewhere from the Coax connection. This IP is, in theory, route-able from anywhere on the internet, barring any traffic shaping from the ISP/Government. This IP is also, despite being an external IP, not a static IP, and is subject (though unlikely to) change at any time. The gateway device then has NAT-ing, routing, DHCP, and firewall services on it, and will hand out internal IPs to your devices such as 10.0.0.100, and will have an internal IP of something like 10.0.0.1 as the internal gateway address. In almost all cases, this is how everyone's home internet is set up, and that external IP doesn't host any services and doesn't allow any traffic into the home network. To get a reliable external IP route-able from anywhere requires a bit more than just using the external IP from your home gateway. I believe an option is using Cloudflare, though this is not a service I have used before. For home-based servers, you can get business-class internet with public static IP addresses. If you are dedicated and willing to spend the money, you can build a real server and rent space in a datacenter like I do. My server gets a network cable from the datacenter, and I get some static IPs to do with as I please within the confines of terms of service of course. If you just want to host a virtual server in someone else's cloud, then that can also use cloudflare or presumably the cloud provider can assign you static external IP addresses.
Firewall and Network
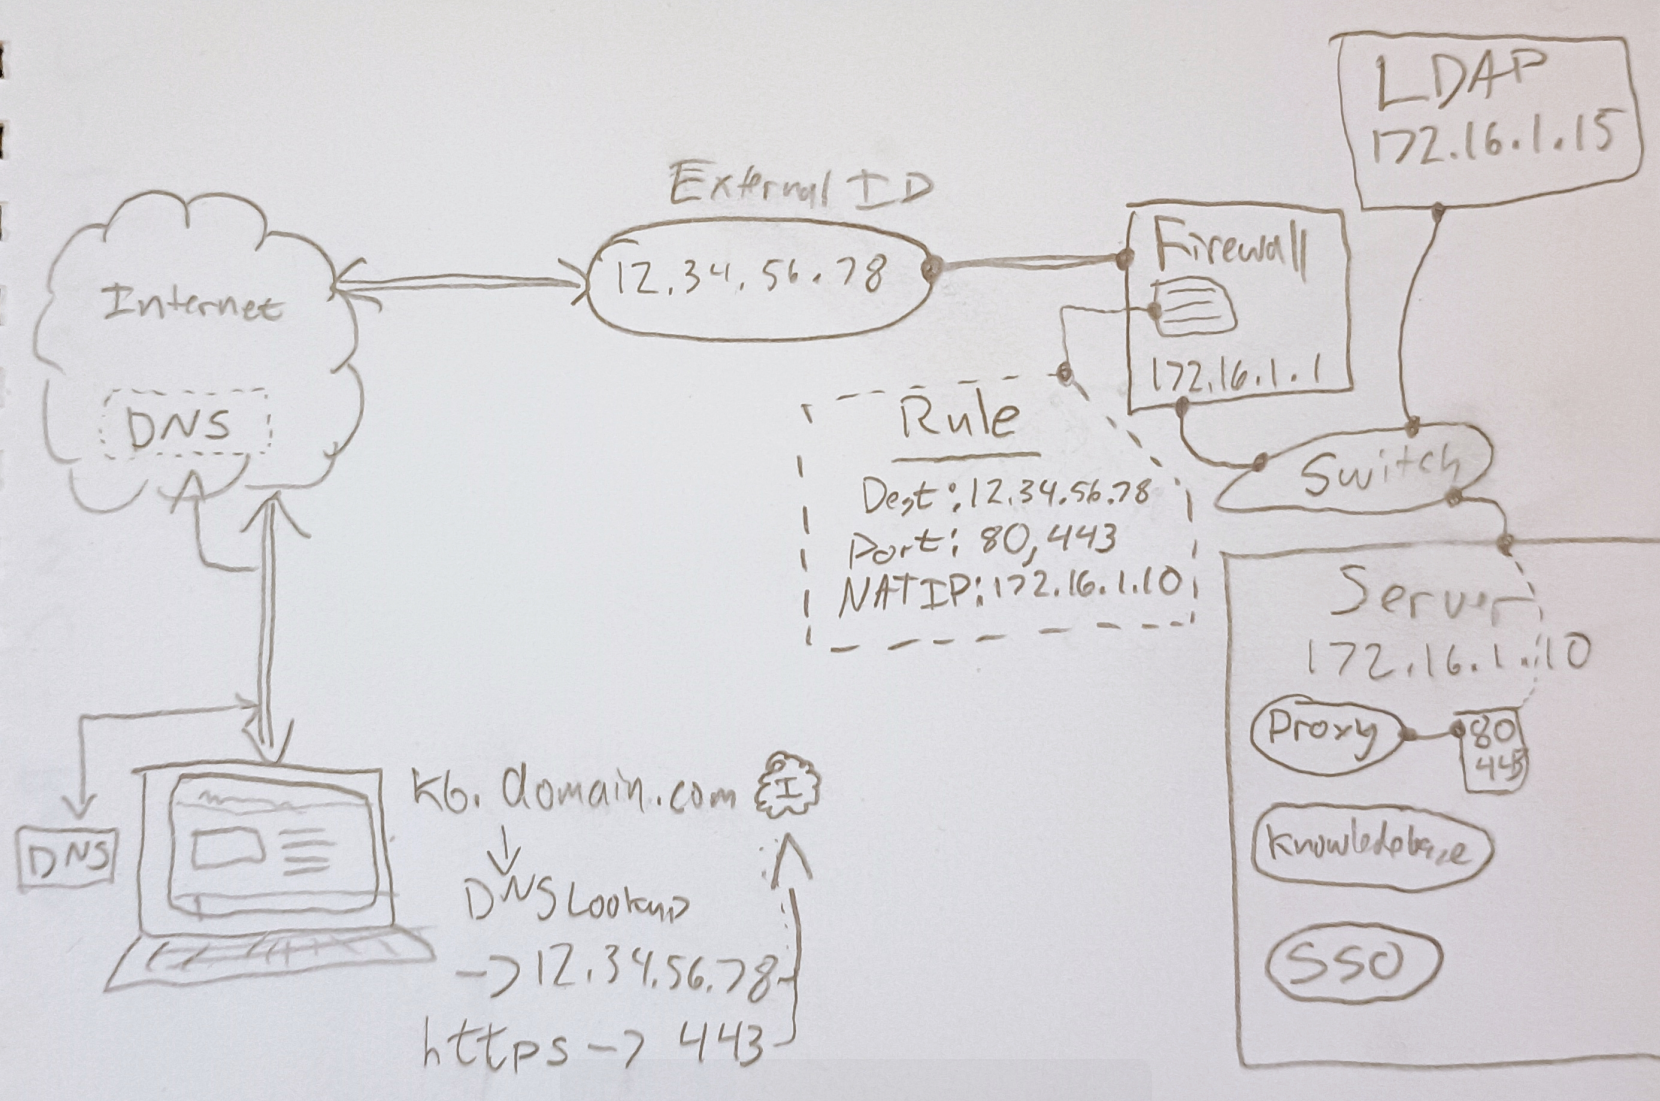
If your external IP address comes in the form of a network cable from some ISP, then you need a firewall. There are so many varieties to choose from, and I am a pfSense simp, despite the shady shit that happened moving from mostly community to mostly commercial. The OS is still free and it works exceptionally well. If your tinfoil hat is thicker than mine, you can check out OPNsense, though I have not. There is also OpenWRT which is harder to use than OPNsense and so I haven't messed with it much. dd-wrt is known for being able to replace proprietary firmware to make old junk less junk. Then there's Unifi's offerings, though I haven't used their stuff for firewalling before. In the commercial world there's Sonicwall, Fortinent, Cisco, Palo Alto, and so many others. Anyways... the important thing is that for you to host a website, you need to forward ports 80 & 443 from the external IP to your web host. Since this is 2025 and we aren't savages running HTTP websites, I recommend using a docker-based proxy that can automatically deal with Let's Encrypt certificates. My old web server that was just an Ubuntu VM with Apache installed had the jankiest setup to make Let's Encrypt to work, and now you just need a docker container and can do that shit in the web, amazing, love it. I drew a diagram that kind of illustrates the entire flow of this stuff and the server end a bit too. The IPs and domains are all made up, but the point does matter. Effectively, a client computer out on the internet types https://kb.domain.com and that client looks up the IP for kb.domain.com as 12.34.56.78, and then it checks port 443 on 12.34.56.78 for https traffic. The server then needs to have some program hosting https traffic that is made accessible from 12.34.56.78 on port 443. I realize this is a very obvious statement, but the point is critical enough that it bears stating. There are many ways to accomplish this flow, and Matt-Cloud has 3 different services dealing with https certificates for different external IPs, but the Billionaire's share of this is done by the proxy container NPM. This is where almost everything on Matt-Cloud flows through. This is linked using NAT on the Firewall. The internal ports don't actually need to be 80 & 443, but I use them anyway with my proxy since it makes it more obvious.
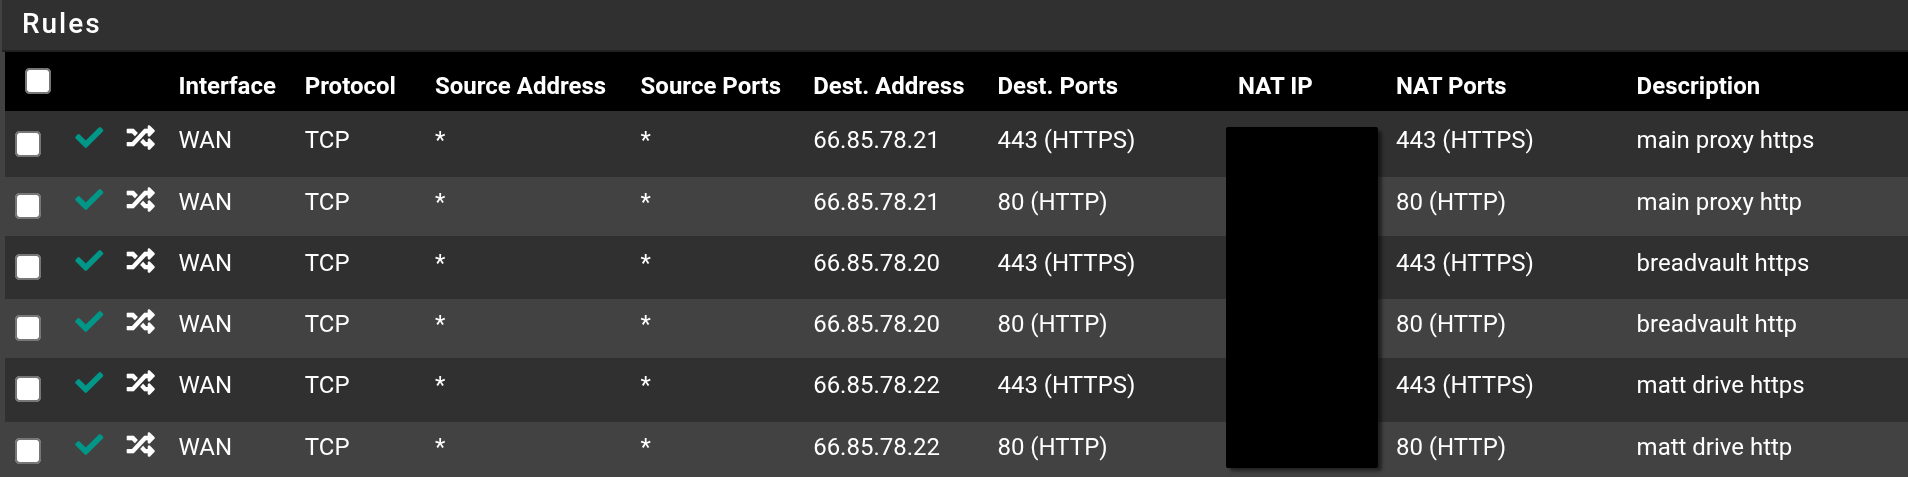
This is what some firewall NAT rules look like. Aside from the main proxy, the web server and Matt-Cloud Drive handle their own HTTPS certificates. The importance of this is that Let's Encrypt authenticates a certificate by matching the external IP of the request for the certificate to the DNS entry for said certificate. Thus, if I want a certificate for auth.domain.com, and I request this certificate from the IP 12.34.56.78, then the IP for that DNS entry must be 12.34.56.78. The NPM container will do all this automatically, and it's a docker container. Since I maintain a singe VM for all my docker containers, this means there is a massive virtual private network (not to be confused with a VPN like IPSec or SSLVPN) running in the docker host's kernel. This private network is unreachable even from the internal network of the docker host, but it is reachable from the NPM container. This means the discrete networks assigned for docker containers can have proxy domains easily assigned to the internal IPs and ports of the various containers. An example of a service using a non-default network is Matt-Cloud Drive. You can see here the sample subnet is 10.20.1.0/24. If the docker server has the IP as in the scrappy picture of 172.16.1.10, then 172.16.1.1 can not reach 10.20.1.0/24, though 172.16.1.0/24 is reachable from the other way because the docker host acts like a router and firewall between all these networks. Thus, the proxy container could reach this subnet and handle the certificates, if the certs for Matt-Cloud Drive weren't one of the two exceptions to the proxy dominance.
docker-compose.yaml - NPM
This is the docker-compose file to spool up an NPM container
# docker-compose.yaml
services:
nginx-proxy:
image: jc21/nginx-proxy-manager:latest
container_name: nginx-proxy
restart: always
ports:
- "172.16.1.10:80:80"
- "172.17.0.1:81:81" # management port, this config makes it only reachable from the docker network stack
- "172.16.1.10:443:443"
volumes:
- /media/docker/proxy/npm_data:/data
- /media/docker/proxy/npm_letsencrypt:/etc/letsencrypt
- /bin/ping:/bin/ping:ro # for troubleshooting
network_mode: bridgeProxy screenshot: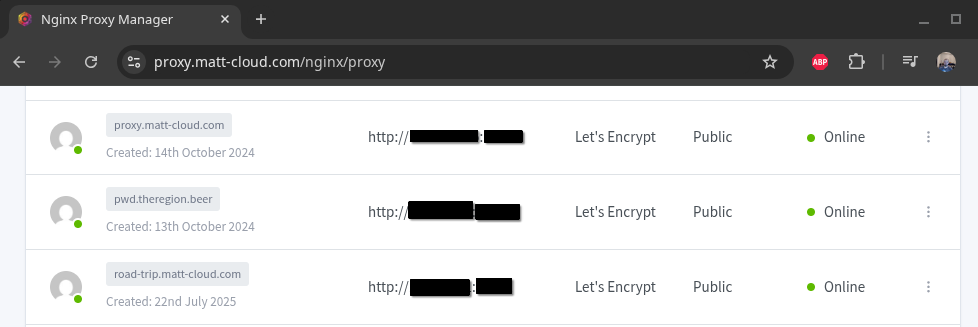
How easy is it to request a certificate? It's this easy, just ask, and if everything is pointed in the right place, then it will just work. 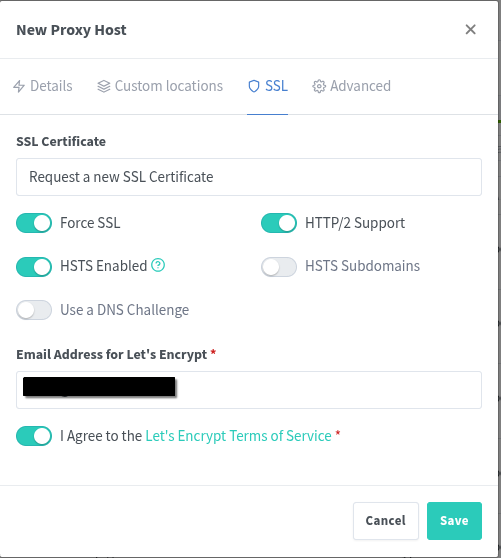
I have another artisinal masterpiece of glory showing a bit of how a docker server works. The network stack can do a bunch of stuff, including Routing and Firewalling. The virtual bridge networks that are hooked into the network stack here are all reachable from each other, but the eth0 can be thought of as the WAN connection on this. If a firewall is not set up, and this IP is set as the gateway address on another network on the system, then those networks might be reachable.
Virtualization and Docker
I use Virtualization and Docker to better utilize the computing power of my server. While Virtualization and Docker are similar in function, I originally had a lot of trouble trying to learn Docker by abstracting it in terms of Virtualization. Once I realized this I made the choice to just create a new "Object" in my head for Docker instead of trying to make it fit into virtualization. Also, both technologies can and should be used concurrently to get the most from a computer given the current software and hardware landscape.
Most of the services I host are based in docker containers now, but I still have about a dozen VMs for various things, including one larger VM that is my docker host. I have assigned the docker host about 50% of all available compute on the main server, and this VM hosts several dozen different containers for different purposes.
Naturally this could all be accomplished by using complete VMs for each different service that docker runs. This would require a lot more overhead, since each VM would need to be provisioned and configured from scratch for each service. Docker can be thought of in some ways as a platform that automates the creation of VMs while leaving out the bits that aren't needed. That said, it isn't actually this, it is just a murky analogy.
Docker can also be thought of as an application like Adobe Acrobat Reader, where PDF files are the containers. The PDF file can be moved from system to system and always look the same. Similarly, a properly configured docker container can be moved from system to system by just moving the files around. Docker also uses a routing network stack, and the containers have their own networks, and ports need to be opened to the host for services to be visible.
A docker container can also be thought of as an application that runs and quits. Specifically, a docker container is built using components and command just to run a final single command and close out. Usually, the command or process is placed in some kind of looping script to keep it running. The point of this is to ensure a consistent platform under which to run the command. In other words, a docker container can be thought of as all the components needed to run one specific command. This command could be something as simple as echo-ing a string to the terminal, or hosting an entire cloud storage platform. The important part is that the bulk of the configuration of a docker container is instructions on how to build the container with all the bits needed for the single command to run successfully.
Given all these different analogies that are applicable to docker, you can see why trying to abstract this as like virtualization but different is not entirely adequate to describe how it works. I find it helpful to just think of a docker container as a whole new thing in my mind instead. One of the things I did on my path to understanding docker was to migrate my password generating website over to docker. That site was originally just some php code connecting to a MySQL server all running on my old web server VM. To get this into docker, I had to configure a container that would have all the web hosting components, the database components, and commands to import the database into the container. Once I made it out the other end of that process, I had a much stronger understanding of docker, and as time has passed I have learned more nuances of the platform.
Jenkins and Ansible
I have since created a larger book covering this topic that is more thorough. It isn't very large, but it's more than this page covers. I have also copied this page over there.
Alright so I figure I'll put down my thought on Ansible and Jenkins along with some of the source code. At the risk of being condescending I will start at the beginning. Jenkins is a web-based utility for running and logging unattended terminal commands. Ansible is a terminal based program for running lists of tasks on remote endpoints. The way I use these together is to use Jenkins to run Ansible. Ansible itself actually runs on the Jenkins host, and it connects to hosts based on inventory files. This requires having a working SSH key in place on your remote endpoints.
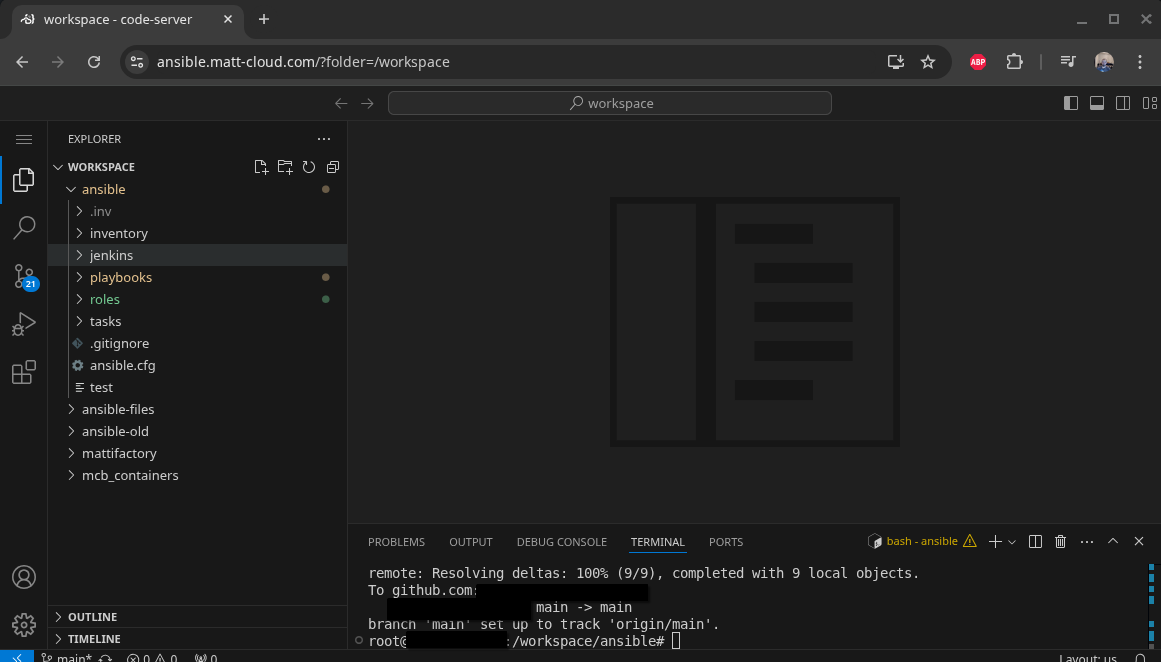
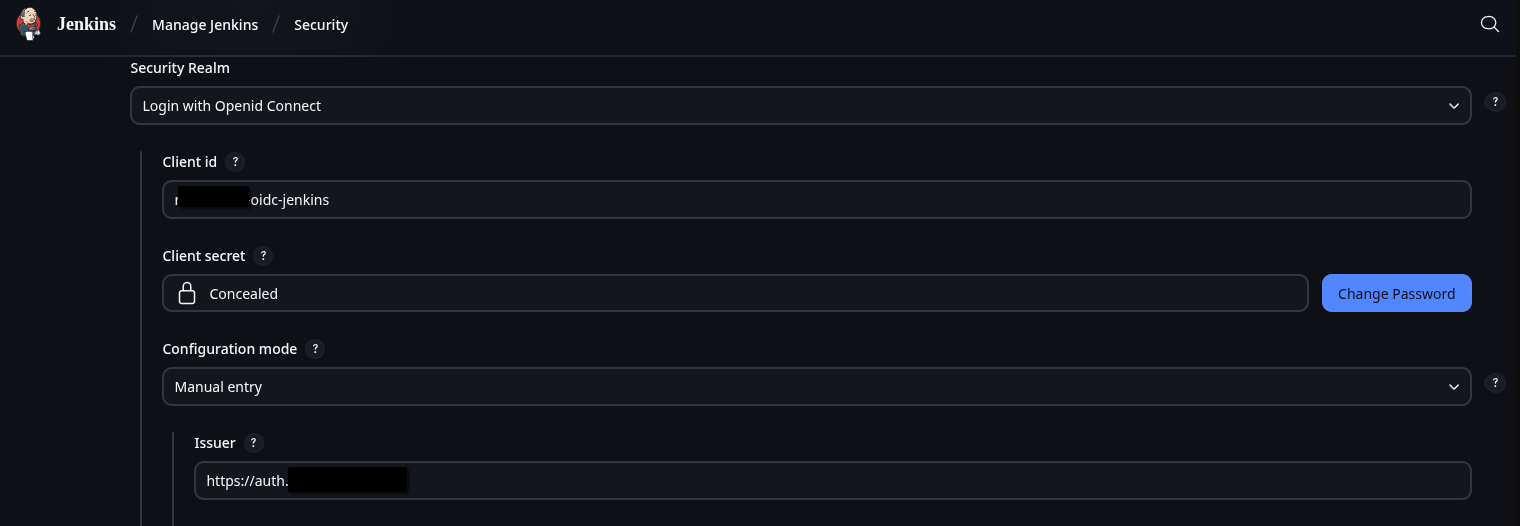
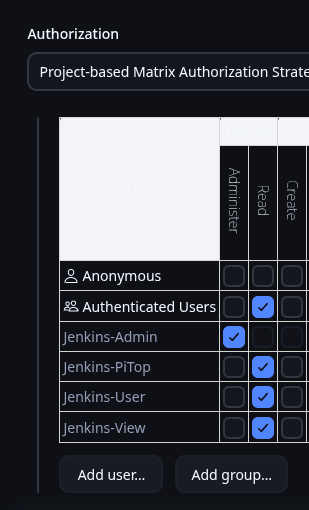
On my own Jenkins instance I use Github to sync my Pipelines with jenkinsfiles on my server, along with LDAP and OIDC for authentication which is way more complicated than a default Jenkins setup. You might have access; you can check your group membership at the Matt-Cloud Group page. Along with that, I use an open-source project to host all my pipelines and playbooks in a website, which itself is hosted behind my SSO. This is not something anyone but me has access to due to how insecure the access is. It is full write access to all files without any knowledge of the connected user. It works by effectively hosting files that live on a Linux system in the browser. I have that running in a docker container, with the paths of the ansible playbooks and jenkins pipelines in it so they can all be viewed and edited in the browser. I also have my code-server container customized so I can sync my github from the built-in terminal in the browser. Github lets me easily sync the Jenkinsfiles between the filesystem and Jenkins itself. Jenkins itself is configured in the browser, so the Docker settings for Jenkins are only a dozen lines or so of mostly volumes. Here are some screenshots of my stuff
Ansible/Jenkins Code Server
Jenkins Home Page

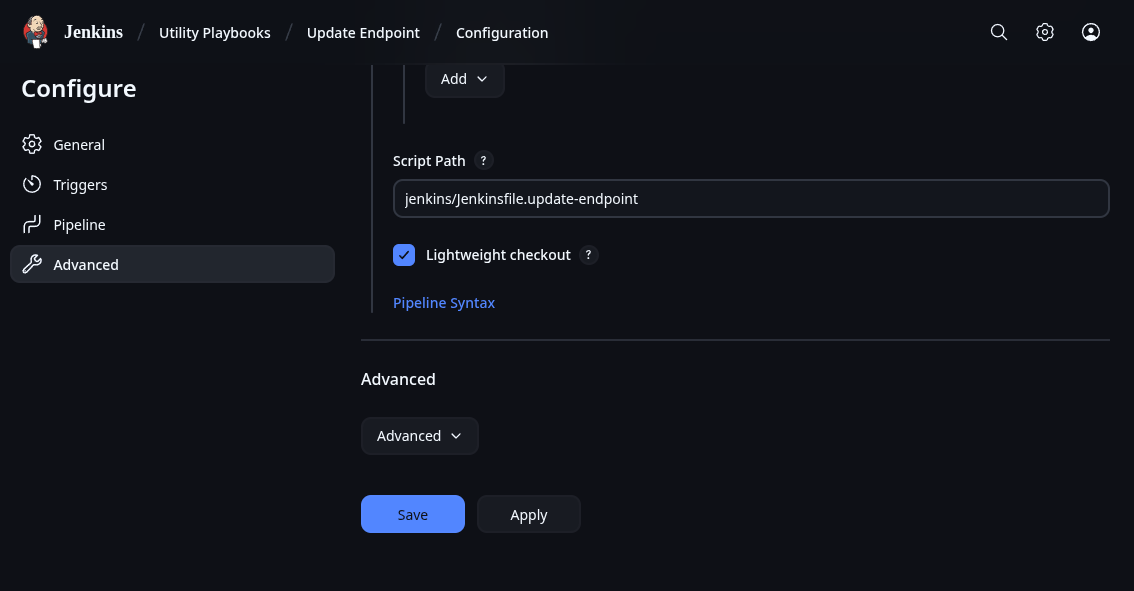
Sample Pipeline Config
Some OIDC Config and Security Settings
Let me start with my own Jenkins. I have recently shared my jenkinsfiles on my Gitea instance. To show how this works I will use the update-endpoint pipeline I have as an example. Most of my pipelines have the same stages of Generate Inventory File, Ansible Playbook, and Remove Inventory File. Once you have Jenkins up and running, and have stored your needed keys, you should be ready to run Ansible. The biggest thing is to make sure the SSH key is accessible. I will include the code for a dynamic inventory file generator here. This makes it obvious how Ansible authenticates. Since the inventory file is intended to be an inventory, it can be used to run the same playbook on multiple hosts.
inventory.sh
#!/bin/bash
# Dynamic inventory generation script ansible
# Function to display usage
usage() {
echo "Usage: $0 -i IP_LIST -u JENKINS_USER -g JENKINS_GROUP [-s] [-v]"
echo "Options:"
echo " -i IP_LIST Comma-separated list of IPs"
echo " -u JENKINS_USER Jenkins user for SSH access"
echo " -g JENKINS_GROUP Jenkins group for SSH access"
echo " -s Set variable to true if more than one IP is passed"
echo " -v Display Ansible Version"
exit 1
}
# Initialize variables with default values
skip=false
more_than_one=false
display_version=false
# Parse command line options
while getopts ":i:u:g:sv" opt; do
case ${opt} in
i ) # process option i
IP_LIST=$OPTARG
;;
u ) # process option u
JENKINS_USER=$OPTARG
;;
g ) # process option g
JENKINS_GROUP=$OPTARG
;;
s ) # process option s
skip=true
;;
v ) # process option v
display_version=true
;;
\? ) usage
;;
esac
done
shift $((OPTIND -1))
# Check if all required options are provided
if [ -z "$IP_LIST" ] || [ -z "$JENKINS_USER" ] || [ -z "$JENKINS_GROUP" ]; then
usage
fi
if $display_version; then
echo "Showing ansible version"
ansible --version
fi
# Generate an 8-character hash from the IP list
hash=$(echo -n "$IP_LIST" | md5sum | cut -c 1-8)
echo "IP List:"
echo $IP_LIST
echo $hash
# Define the inventory file path with the hash
inventory_file="/var/jenkins_home/ansible/.inv/inventory-$hash.yml"
if $skip; then
IFS=',' read -ra IPS <<< "$IP_LIST"
if [ ${#IPS[@]} -gt 1 ]; then
more_than_one=true
fi
fi
if $skip; then
echo "Single host option set"
if $more_than_one; then
echo "IP list provided, inventory will be emptied"
IP_LIST=""
fi
fi
# Initialize the YAML inventory content
inventory_content="---
all:
hosts:
"
# Loop through each IP in the comma-separated list
IFS=',' read -ra IPS <<< "$IP_LIST"
for IP in "${IPS[@]}"; do
inventory_content+=" ${IP}:
ansible_user: root
"
done
inventory_content+=" vars:
ansible_connection: ssh
ansible_ssh_private_key_file: /var/jenkins_home/jenkins_key
ansible_python_interpreter: /usr/bin/python3
jenkins_user: '${JENKINS_USER}'
jenkins_group: '${JENKINS_GROUP}'
"
# Write the inventory content to the file
echo "$inventory_content" > $inventory_file
echo "Inventory file created at $inventory_file with the following content:"
cat $inventory_file
This shows up in the pipeline run thusly:
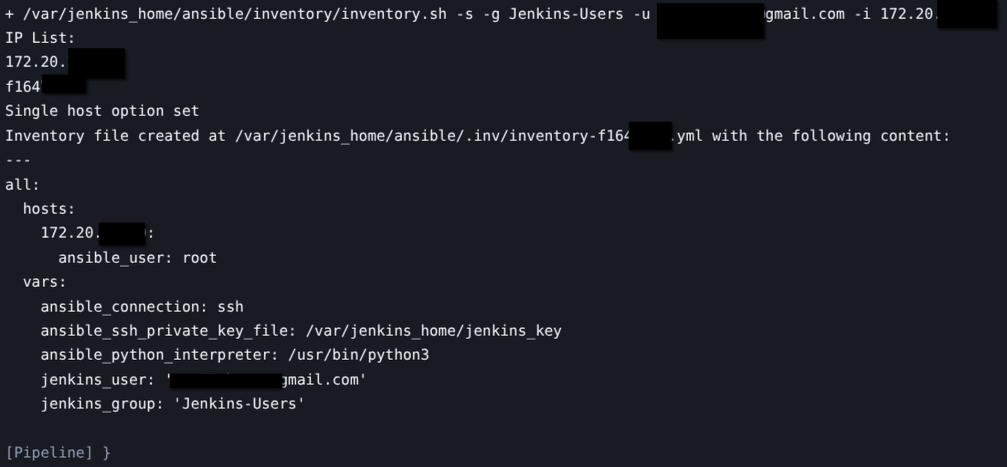
After generating the inventory file, Ansible can just be ran by calling the playbook for the inventory. When you pick apart the Jenkinsfiles, the critical portion is this bit.
ansible-playbook -i \$inventory_file \/var/jenkins_home/ansible/playbooks/update-endpoint.yaml --ssh-common-args='-o StrictHostKeyChecking=no'SSO Details
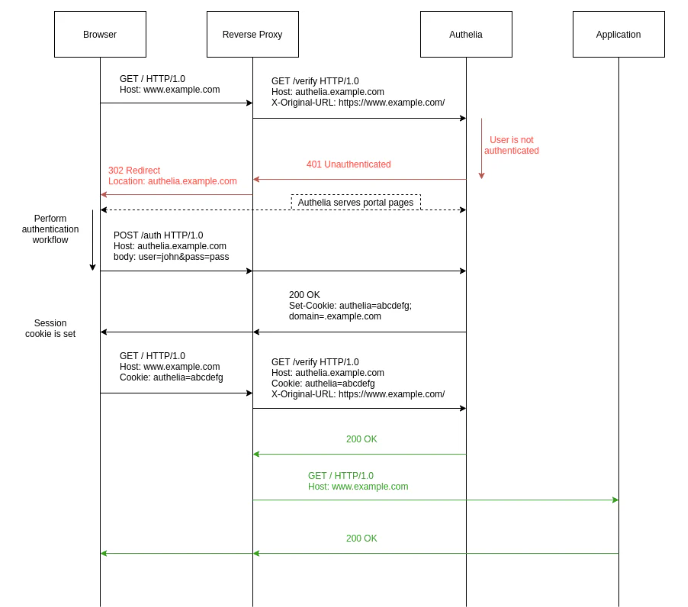
The SSO is handled by Authelia, and a lot of my configs are based on this page. It was pretty difficult to get this going, but now that it is I will give an overview of how it works. It is integrated with the proxy server so that when SSO protected domains are requested my proxy server hands the request off to Authelia for authentication. Authelia sets a cookie when you first log in, so if you've already logged in somewhere, it will just pass you through to the website. I also was able to cobble together OIDC integration with Authelia, and that is integrated with my audiobook site as well as this book stack site.
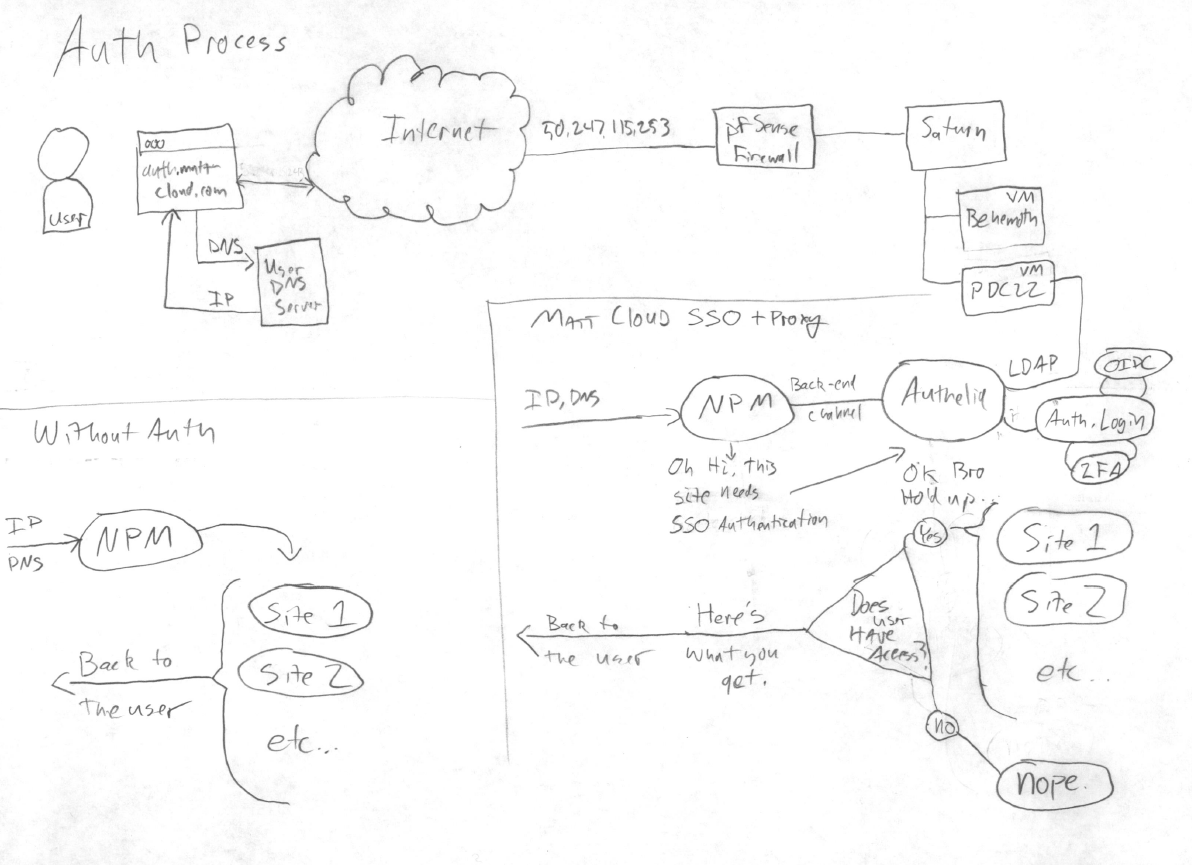
Here's a diagram of how the proxy, SSO, and containers interact. The site items with ovals are the docker containers with open ports that the proxy server would normally forward unfettered. On sites that need SSO, I add a big pile of code to the custom part of the NPM site config that tells it to finish up with Authelia. Then, Authelia does it's stuff based on the config file. The nope in the oval is the forbidden page that you see when you are logged into SSO and try to access a site that Authelia says nope to.
Here is Authelia's diagram of how they do stuff
Here is my diagram of how it works on Matt-Cloud.
For the terribly curious, here is a stripped out docker-compose.yaml and configuration.yml for authelia and the nginx configs.
docker-compose.yaml
services:
authelia:
container_name: authelia
image: 'authelia/authelia'
restart: always
network_mode: bridge
ports:
- 9091:9091
volumes:
- ./authelia-config:/config
- ./authelia-secrets:/secrets
authelia-redis:
container_name: authelia-redis
image: bitnami/redis:latest
volumes:
- ./authelia-redis:/bitnami/
environment:
REDIS_PASSWORD: "lolwtfbbqlolwtfbbq"
restart: always
network_mode: bridge
ports:
- 6379:6379
authelia-db:
image: postgres
container_name: authelia-db
restart: always
network_mode: bridge
volumes:
- ./authelia-db:/var/lib/postgresql/data
environment:
POSTGRES_DB: authelia
POSTGRES_USER: authelia
POSTGRES_PASSWORD: lolwtfbbqlolwtfbbq
ports:
- 5432:5432
configuration.yml
---
###############################################################################
# Authelia Configuration #
###############################################################################
theme: dark
jwt_secret: "lolwtfbbqlolwtfbbq"
default_redirection_url: https://auth.domain.com/
server:
host: 0.0.0.0
port: 9091
disable_healthcheck: false
log:
level: info
totp:
disable: false
issuer: 'auth.domain.com'
algorithm: 'sha1'
digits: 6
period: 30
skew: 1
secret_size: 32
allowed_algorithms:
- 'SHA1'
allowed_digits:
- 6
allowed_periods:
- 30
disable_reuse_security_policy: false
authentication_backend:
ldap:
address: 'ldap://pdc.domain.local:389'
implementation: 'activedirectory'
base_dn: 'OU=users,DC=domain,DC=local'
users_filter: (&(|({username_attribute}={input})({mail_attribute}={input}))(objectCategory=person)(objectClass=user)(!userAccountControl:1.2.840.113556.1.4.803:=2)(!pwdLastSet=0))
groups_filter: (&(member:1.2.840.113556.1.4.1941:={dn})(objectClass=group)(objectCategory=group))
group_name_attribute: cn
mail_attribute: mail
display_name_attribute: displayname
user: 'CN=LDAP Service,OU=Service,OU=users,DC=domain,DC=local'
password: 'lolwtfbbq'
disable_reset_password: true
access_control:
## just some simple example rules
default_policy: deny
rules:
## bypass rule
- domain:
- "auth.domain.com"
policy: bypass
- domain:
- "*.domain.com"
resources:
- "^/api([/?].*)?$"
policy: bypass
## 2fa domain
- domain:
- "2fa.domain.com"
policy: two_factor
subject:
- "group:2FA-Users"
# Normal protection
- domain:
- "secure.domain.com"
policy: one_factor
subject: "group:secure-users"
session:
name: authelia_session
domain: domain.com
same_site: lax
secret: "lolwtfbbqlolwtfbbq"
expiration: 30d
inactivity: 1d
remember_me_duration: 6M
redis:
host: 0.0.0.0
port: 6379
password: "lolwtfbbqlolwtfbbq"
database_index: 0
maximum_active_connections: 10
minimum_idle_connections: 0
regulation:
max_retries: 3
find_time: 10m
ban_time: 12h
storage:
encryption_key: 'lolwtfbbqlolwtfbbq'
postgres:
address: 'tcp://0.0.0.0:5432'
database: 'authelia'
schema: 'public'
username: 'authelia'
password: 'lolwtfbbqlolwtfbbq'
notifier:
disable_startup_check: false
smtp:
username: authelia@domain.com
password: "lolwtfbbqlolwtfbbq"
host: mail.domain.com
port: 587
sender: authelia@domain.com
identifier: authelia.domain.local
subject: "[Authelia] {title}"
startup_check_address: user@domain.com
disable_require_tls: false
disable_html_emails: true
tls:
skip_verify: false
minimum_version: TLS1.2
identity_providers:
oidc:
hmac_secret: lolwtfbbqlolwtfbbq # provide secure secret
issuer_certificate_chain: |
-----BEGIN CERTIFICATE-----
lolwtfbbqlolwtfbbq
lolwtfbbqlolwtfbbq
lolwtfbbqlolwtfbbq
lolwtfbbqlolwtfbbq
lolwtfbbqlolwtfbbq
lolwtfbbqlolwtfbbq
lolwtfbbqlolwtfbbq
lolwtfbbqlolwtfbbq
lolwtfbbqlolwtfbbq
lolwtfbbqlolwtfbbq
-----END CERTIFICATE-----
issuer_private_key: |
-----BEGIN PRIVATE KEY-----
lolwtfbbqlolwtfbbq
lolwtfbbqlolwtfbbq
lolwtfbbqlolwtfbbq
lolwtfbbqlolwtfbbq
lolwtfbbqlolwtfbbq
lolwtfbbqlolwtfbbq
lolwtfbbqlolwtfbbq
lolwtfbbqlolwtfbbq
lolwtfbbqlolwtfbbq
lolwtfbbqlolwtfbbq
-----END PRIVATE KEY-----
access_token_lifespan: 1h
authorize_code_lifespan: 1m
id_token_lifespan: 1h
refresh_token_lifespan: 90m
enable_client_debug_messages: false
enforce_pkce: public_clients_only
cors:
endpoints:
- authorization
- token
- revocation
- introspection
allowed_origins:
- https://*.domain.com # adjust to your url
allowed_origins_from_client_redirect_uris: false
clients:
- id: domain-oidc
description: domain
secret: 'lolwtfbbqlolwtfbbq' # provide secure secret
sector_identifier: 'auth.domain.com'
public: false
authorization_policy: one_factor # may use two_factor to enforce 2FA
consent_mode: implicit
pre_configured_consent_duration: 6m
audience: []
scopes:
- openid
- groups
- email
- profile
redirect_uris: # adjust to your domains
- https://auth.domain.com/
- https://auth.domain.com/oauth2/callback
- https://audiobooks.domain.com/oauth2/callback
- https://audiobooks.domain.com/auth/login
- https://audiobooks.domain.com/user-settings
- https://audiobooks.domain.com
- https://audiobooks.domain.com/auth/openid/callback
grant_types:
- refresh_token
- authorization_code
- implicit
response_types:
- code
- id_token
response_modes:
- form_post
- query
- fragment
userinfo_signing_algorithm: nonenginx-server
location / {
set $upstream_authelia http://172.17.0.1:9091; # This example assumes a Docker deployment
proxy_pass $upstream_authelia;
client_body_buffer_size 128k;
#Timeout if the real server is dead
proxy_next_upstream error timeout invalid_header http_500 http_502 http_503;
# Advanced Proxy Config
send_timeout 5m;
proxy_read_timeout 360;
proxy_send_timeout 360;
proxy_connect_timeout 360;
# Basic Proxy Config
proxy_set_header Host $host;
proxy_set_header X-Real-IP $remote_addr;
proxy_set_header X-Forwarded-For $proxy_add_x_forwarded_for;
proxy_set_header X-Forwarded-Proto $scheme;
proxy_set_header X-Forwarded-Host $http_host;
proxy_set_header X-Forwarded-Uri $request_uri;
proxy_set_header X-Forwarded-Ssl on;
proxy_redirect http:// $scheme://;
proxy_http_version 1.1;
proxy_set_header Connection "";
proxy_cache_bypass $cookie_session;
proxy_no_cache $cookie_session;
proxy_buffers 64 256k;
# If behind a reverse proxy, forwards the correct IP, assumes you're using Cloudflare. Adjust IP for your Docker network.
set_real_ip_from 172.17.0.0/16;
set_real_ip_from 10.0.0.0/8;
real_ip_header X-Forwarded-For;
real_ip_recursive on;
}nginx-client
location /authelia {
internal;
set $upstream_authelia http://0.0.0.0:9091/api/verify;
proxy_pass_request_body off;
proxy_pass $upstream_authelia;
proxy_set_header Content-Length "";
# Timeout if the real server is dead
proxy_next_upstream error timeout invalid_header http_500 http_502 http_503;
client_body_buffer_size 128k;
proxy_set_header Host $host;
proxy_set_header X-Original-URL $scheme://$http_host$request_uri;
proxy_set_header X-Real-IP $remote_addr;
proxy_set_header X-Forwarded-For $remote_addr;
proxy_set_header X-Forwarded-Proto $scheme;
proxy_set_header X-Forwarded-Host $http_host;
proxy_set_header X-Forwarded-Uri $request_uri;
proxy_set_header X-Forwarded-Ssl on;
proxy_redirect http:// $scheme://;
proxy_http_version 1.1;
proxy_set_header Connection "";
proxy_cache_bypass $cookie_session;
proxy_no_cache $cookie_session;
proxy_buffers 4 32k;
send_timeout 5m;
proxy_read_timeout 240;
proxy_send_timeout 240;
proxy_connect_timeout 240;
}
location / {
set $upstream_app $forward_scheme://$server:$port;
proxy_pass $upstream_app;
auth_request /authelia;
auth_request_set $target_url https://$http_host$request_uri;
auth_request_set $user $upstream_http_remote_user;
auth_request_set $email $upstream_http_remote_email;
auth_request_set $groups $upstream_http_remote_groups;
proxy_set_header Remote-User $user;
proxy_set_header Remote-Email $email;
proxy_set_header Remote-Groups $groups;
error_page 401 =302 https://auth.domain.com/?rd=$target_url;
client_body_buffer_size 128k;
proxy_next_upstream error timeout invalid_header http_500 http_502 http_503;
send_timeout 5m;
proxy_read_timeout 360;
proxy_send_timeout 360;
proxy_connect_timeout 360;
proxy_set_header Host $host;
proxy_set_header Upgrade $http_upgrade;
proxy_set_header Connection upgrade;
proxy_set_header Accept-Encoding gzip;
proxy_set_header X-Real-IP $remote_addr;
proxy_set_header X-Forwarded-For $proxy_add_x_forwarded_for;
proxy_set_header X-Forwarded-Proto $scheme;
proxy_set_header X-Forwarded-Host $http_host;
proxy_set_header X-Forwarded-Uri $request_uri;
proxy_set_header X-Forwarded-Ssl on;
proxy_redirect http:// $scheme://;
proxy_http_version 1.1;
proxy_set_header Connection "";
proxy_cache_bypass $cookie_session;
proxy_no_cache $cookie_session;
proxy_buffers 64 256k;
set_real_ip_from 172.17.0.0/16;
set_real_ip_from 10.0.0.0/8;
real_ip_header X-Forwarded-For;
real_ip_recursive on;
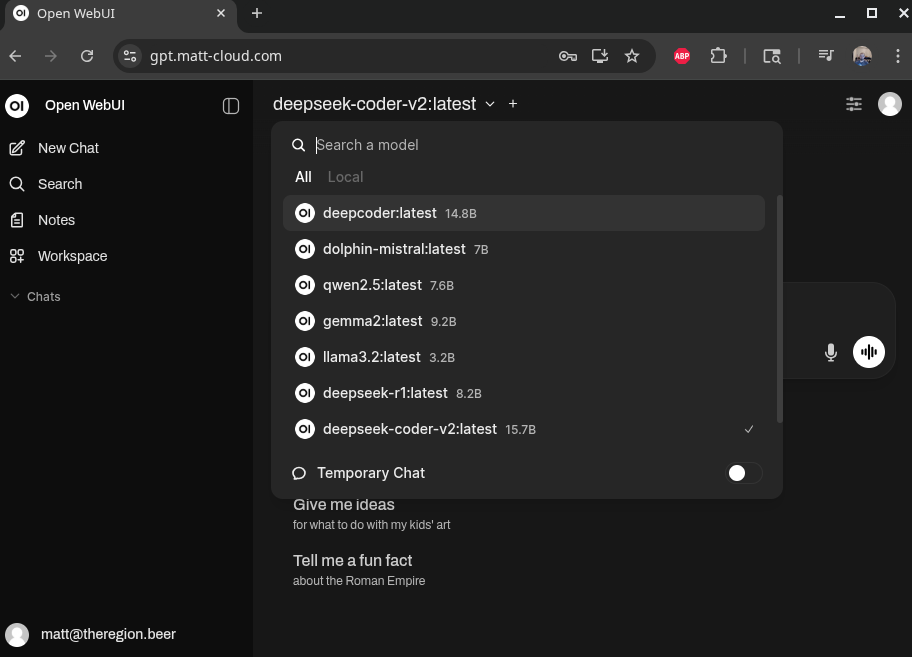
}MattGPT
I am able to run a local GPT platform based on this software. I have also added it to my SSO and I think that's pretty neat. This means if you want access, you can ask me for it.
Here's my Docker Compose and Authelia config.
docker-compose.yaml
services:
ollama:
image: ghcr.io/open-webui/open-webui:ollama
container_name: mattgpt
volumes:
- ollama:/root/.ollama
- open-webui:/app/backend/data
environment:
WEBUI_URL: 'https://gpt.domain.com'
ENABLE_OAUTH_SIGNUP: 'true'
OAUTH_MERGE_ACCOUNTS_BY_EMAIL: 'true'
OAUTH_CLIENT_ID: 'gpt-oidc'
OAUTH_CLIENT_SECRET: 'makeupanicelongstringofletters'
OPENID_PROVIDER_URL: 'https://auth.domain.com/.well-known/openid-configuration'
OAUTH_PROVIDER_NAME: 'Authelia'
OAUTH_SCOPES: 'openid email profile groups'
ENABLE_OAUTH_ROLE_MANAGEMENT: 'true'
OAUTH_ALLOWED_ROLES: 'gpt-access,gpt-admin'
OAUTH_ADMIN_ROLES: 'gpt-admin'
OAUTH_ROLES_CLAIM: 'groups'
ports:
- 8080:8080
restart: always
network_mode: bridge
deploy:
resources:
reservations:
devices:
- driver: nvidia
count: 2
capabilities: [gpu]
volumes:
ollama:
driver: local # Define the driver and options under the volume name
driver_opts:
type: none
device: ./ollama
o: bind
open-webui:
driver: local # Define the driver and options under the volume name
driver_opts:
type: none
device: ./open-webui
o: bind
authelia-configuration.yml
For a functioning Authelia instance, pertinent configurations included
access_control:
rules:
# MattGPT access
- domain: gpt.domain.com
policy: one_factor
subject:
- "group:gpt-access"
- "group:gpt-admin"
identity_providers:
oidc:
clients:
- id: gpt-oidc
client_id: gpt-oidc
client_name: "gpt-oidc"
description: gpt-oidc
secret: 'makeupanicelongstringofletters'
sector_identifier: 'auth.domain.com'
public: false
response_types:
- 'code'
authorization_policy: one_factor
consent_mode: implicit
#pre_configured_consent_duration: 6m
audience: []
scopes:
- openid
- groups
- email
- profile
redirect_uris:
- https://gpt.domain.com
- https://gpt.domain.com/oauth/oidc/callback
access_token_signed_response_alg: 'none'
userinfo_signing_algorithm: none
token_endpoint_auth_method: 'client_secret_basic'
Sample Screenshot.
Matt-Cloud Drive
Here are the updated configurations for the LDAP/OIDC sync. What that means is that, if you can configure this properly, it will auto login with the authelia SSO you already have set up. This has been anonymized and not proofread terribly well, so if you are gonna try to replicate this, make sure you pretend like this was written by ChatGPT and verify everything.
Another few notes, specifically about onlyoffice integration. It seems like it needs to be blown up when it's restarted. Make new dirs and destroy the container and restart it. Seemed to work when saving stopped working when consolidating this shite.
Additional notes about domains. The seafile domain should be drive.domain.com, and will need 80 & 443 pointed at the real IP on the host, in this example 192.168.1.10. The onlyoffice instance DNS is office.domain.com and should be pointed at the IP and port in this example 10.20.1.1:81. The IPs can be changed as needed. Please note that in my setup I have a proxy managing most of the domain.com in this example, and this is what handles the SSL certs for office.domain.com. Since I have multiple public static IPs, I can have my firewall point one IP to drive and another IP to office. If you only have a single external IP, you can disable the SSL in seafile and probably rig it all through a single proxy.
seahub_settings.py
# -*- coding: utf-8 -*-
SECRET_KEY = "deadbeefsecretlolz"
SERVICE_URL = "http://drive.domain.com"
DATABASES = {
'default': {
'ENGINE': 'django.db.backends.mysql',
'NAME': 'seahub_db',
'USER': 'seafile',
'PASSWORD': 'deadbeefsecretlolz',
'HOST': '10.20.1.1',
'PORT': '3306',
'OPTIONS': {'charset': 'utf8mb4'},
}
}
CACHES = {
'default': {
'BACKEND': 'django_pylibmc.memcached.PyLibMCCache',
'LOCATION': 'memcached:11211',
},
'locmem': {
'BACKEND': 'django.core.cache.backends.locmem.LocMemCache',
},
}
COMPRESS_CACHE_BACKEND = 'locmem'
TIME_ZONE = 'America/Los_Angeles'
FILE_SERVER_ROOT = 'https://drive.domain.com/seafhttp'
ENABLE_LDAP = True
LDAP_SERVER_URL = 'ldap://192.168.1.15'
LDAP_BASE_DN = 'OU=Users,DC=domain,DC=local'
LDAP_ADMIN_DN = 'docker-ldap@domain.local'
LDAP_ADMIN_PASSWORD = 'deadbeefsecretlolz'
LDAP_PROVIDER = 'ldap'
LDAP_LOGIN_ATTR = 'sAMAccountName'
LDAP_USER_FIRST_NAME_ATTR = 'givenName'
LDAP_USER_LAST_NAME_ATTR = 'sn'
LDAP_USER_NAME_REVERSE = False
SSO_LDAP_USE_SAME_UID = True
LDAP_FILTER = 'memberOf=CN=Seafile,OU=AD-Groups,OU=Users,DC=domain,DC=local'
ENABLE_OAUTH = True
OAUTH_ENABLE_INSECURE_TRANSPORT = False
OAUTH_CLIENT_ID = "matt-drive-oidc"
OAUTH_CLIENT_SECRET = "deadbeefsecretlolz"
OAUTH_REDIRECT_URL = 'https://drive.domain.com/oauth/callback/'
OAUTH_PROVIDER_DOMAIN = 'auth.domain.com'
OAUTH_AUTHORIZATION_URL = 'https://auth.domain.com/api/oidc/authorization'
OAUTH_TOKEN_URL = 'https://auth.domain.com/api/oidc/token'
OAUTH_USER_INFO_URL = 'https://auth.domain.com/api/oidc/userinfo'
OAUTH_SCOPE = [
"openid",
"profile",
"email",
]
OAUTH_ATTRIBUTE_MAP = {
"preferred_username": (True, "uid") ,
"preferred_username": (True, "email"),
"name": (False, "name"),
}
ENABLE_SEADOC = True
SEADOC_PRIVATE_KEY = 'deadbeefsecretlolz' # sdoc-server private_key
SEADOC_SERVER_URL = 'https://drive.domain.com/sdoc-server' # sdoc-server service url
# When SeaDoc and Seafile/Seafile docker are deployed on the same host, SEADOC_SERVER_URL should be 'https://seafile.example.com/sdoc-server'
FILE_CONVERTER_SERVER_URL = 'http://192.168.1.10:8888' # converter-server url
# When SeaDoc and Seafile are deployed on the same host, FILE_CONVERTER_SERVER_URL should be LAN address 'http://127.0.0.1:8888'
# When SeaDoc and Seafile docker are deployed on the same host, FILE_CONVERTER_SERVER_URL should be http://sdoc-server:8888
# M@O8VWUb81YvmtWLHGB2I_V7di5-@0p(MF*GrE!sIws23F
ENABLE_ONLYOFFICE = True
ONLYOFFICE_APIJS_URL = 'https://office.domain.com/web-apps/apps/api/documents/api.js'
ONLYOFFICE_FILE_EXTENSION = ('doc', 'docx', 'ppt', 'pptx', 'xls', 'xlsx', 'odt', 'fodt', 'odp', 'fodp', 'ods', 'fods', 'csv', 'ppsx', 'pps')
ONLYOFFICE_EDIT_FILE_EXTENSION = ('docx','pptx','xlsx')
ONLYOFFICE_JWT_SECRET = 'deadbeefsecretlolz'
docker-compose.yaml
services:
seafile:
image: seafileltd/seafile-mc:12.0-latest
container_name: mc-drive-seafile
restart: always
ports:
- "192.168.1.10:80:80"
- "192.168.1.10:443:443"
volumes:
# On my setup, the folder /media/seafile
# maps to an 8TB volume
# as this is where the data lives
- /media/seafile/data:/shared
# These are for config files
- ./seahub_settings.py:/shared/seafile/conf/seahub_settings.py
- ./seafile.nginx.conf:/shared/nginx/conf/seafile.nginx.conf
environment:
- DB_HOST=10.20.1.1
- DB_ROOT_PASSWD=deadbeefsecretlol
- DB_PASSWORD=deadbeefsecretlol
- TIME_ZONE=America/Los_Angeles
- SEAFILE_SERVER_HOSTNAME=drive.domain.com
- SEAFILE_SERVER_PROTOCOL=https
- SEAFILE_SERVER_LETSENCRYPT=true
- SITE_ROOT=/
- JWT_PRIVATE_KEY=deadbeefsecretlol
- ENABLE_SEADOC=true
- SEADOC_SERVER_URL=https://drive.domain.com/sdoc-server
depends_on:
- db
- memcached
networks:
- net
seadoc:
image: seafileltd/sdoc-server:1.0-latest
container_name: seadoc
volumes:
- /media/docker/seafile/seadoc-data/:/shared
environment:
- DB_HOST=10.20.1.1
- DB_PORT=3306
- DB_USER=root
- DB_PASSWORD=deadbeefsecretlol
- DB_NAME=seahub_db
- TIME_ZONE=America/Los_Angeles
- JWT_PRIVATE_KEY=deadbeefsecretlol
- SEAHUB_SERVICE_URL=https://drive.domain.com
- SDOC_SERVER_LETSENCRYPT=true # Whether to use https or not.
- SDOC_SERVER_HOSTNAME=drive.domain.com # Specifies your host name if https is enabled.
ports:
- 192.168.1.20:7070:7070
- 192.168.1.20:8888:8888
networks:
- net
db:
image: mariadb:10.11
restart: always
container_name: mc-drive-seafile-mysql
ports:
- "10.20.1.1:3306:3306"
environment:
- MYSQL_ROOT_PASSWORD=deadbeefsecretlol
- MYSQL_LOG_CONSOLE=true
- MARIADB_AUTO_UPGRADE=1
volumes:
- /media/docker/seafile/db:/var/lib/mysql
networks:
- net
memcached:
image: memcached:1.6.29
restart: always
container_name: mc-drive-seafile-memcached
entrypoint: memcached -m 256
networks:
- net
onlyoffice:
image: onlyoffice/documentserver
container_name: office.domain.com
environment:
- JWT_SECRET=deadbeefsecretlol
- JWT_ENABLED=true
restart: always
networks:
- net
volumes:
- log:/var/log/onlyoffice
- etc-oo:/etc/onlyoffice
- www:/var/www/onlyoffice/Data
- var-oo:/var/lib/onlyoffice
- var-db:/var/lib/postgresql
ports:
- "10.20.1.1:81:80"
volumes:
log:
driver: local
driver_opts:
type: none
device: /media/docker/seafile/onlyoffice/log
o: bind
www:
driver: local
driver_opts:
type: none
device: /media/docker/seafile/onlyoffice/www
o: bind
etc-oo:
driver: local
driver_opts:
type: none
device: /media/docker/seafile/onlyoffice/etc-oo
o: bind
var-oo:
driver: local
driver_opts:
type: none
device: /media/docker/seafile/onlyoffice/var-oo
o: bind
var-db:
driver: local
driver_opts:
type: none
device: /media/docker/seafile/onlyoffice/var-db
o: bind
networks:
net:
driver: bridge
ipam:
driver: default
config:
-
subnet: 10.20.1.0/24Matt-Cloud Media
In the years since I first set up Jellyfin, there have been updates and new features. One new feature was an OIDC plugin, and I knew I had to have it. The drawback here is that I need to update the library again, which means re-tagging hundreds of movies again... I don't want to update my old clunky container I set up two years ago.
Here is the OIDC plugin. The plugin has to be added to jellyfin, and then it can be configured in the GUI. This of course needs to be configured in Authelia as well.
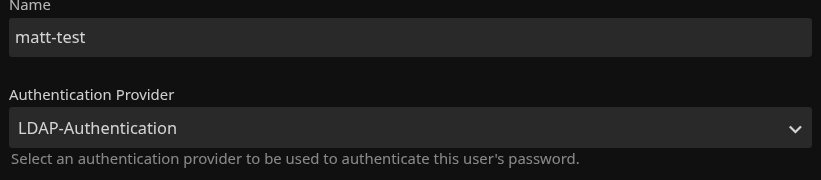
This is the key to syncing the LDAP and OIDC.Jellyfin.Plugin.LDAP_Auth.LdapAuthenticationProviderPlugin
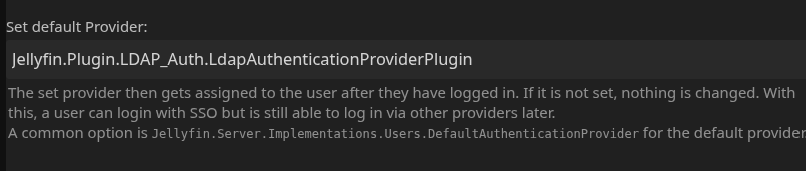
This makes new user accounts default to this option, which makes normal passwords work.
configuration.yml excerpt
- client_id: 'jellyfin-oidc'
client_name: 'jellyfin-oidc'
secret: 'makeupabigoldpassword'
public: false
authorization_policy: 'one_factor'
require_pkce: true
pkce_challenge_method: 'S256'
consent_mode: implicit
redirect_uris:
- 'https://media.domain.com/sso/OID/redirect/authelia
scopes:
- 'openid'
- 'profile'
- 'groups'
response_types:
- 'code'
grant_types:
- 'authorization_code'
access_token_signed_response_alg: 'none'
userinfo_signed_response_alg: 'none'
token_endpoint_auth_method: 'client_secret_post'SSO-Auth.xml
This file is located at config/data/plugins/configurations/SSO-Auth.xml when using the docker image for Jellyfin
<?xml version="1.0" encoding="utf-8"?>
<PluginConfiguration xmlns:xsi="http://www.w3.org/2001/XMLSchema-instance" xmlns:xsd="http://www.w3.org/2001/XMLSchema">
<SamlConfigs />
<OidConfigs>
<item>
<key>
<string>authelia</string>
</key>
<value>
<PluginConfiguration>
<OidEndpoint>https://auth.domain.com</OidEndpoint>
<OidClientId>jellyfin-oidc</OidClientId>
<OidSecret>makeupabigoldpassword</OidSecret>
<Enabled>true</Enabled>
<EnableAuthorization>true</EnableAuthorization>
<EnableAllFolders>true</EnableAllFolders>
<EnabledFolders />
<AdminRoles>
<string>Jellyfin-Admin</string>
</AdminRoles>
<Roles>
<string>Jellyfin-Users</string>
<string>Jellyfin-Admin</string>
</Roles>
<EnableFolderRoles>false</EnableFolderRoles>
<EnableLiveTvRoles>false</EnableLiveTvRoles>
<EnableLiveTv>false</EnableLiveTv>
<EnableLiveTvManagement>false</EnableLiveTvManagement>
<LiveTvRoles />
<LiveTvManagementRoles />
<FolderRoleMappings />
<RoleClaim>groups</RoleClaim>
<OidScopes>
<string>groups</string>
</OidScopes>
<DefaultProvider>Jellyfin.Plugin.LDAP_Auth.LdapAuthenticationProviderPlugin</DefaultProvider>
<SchemeOverride>https</SchemeOverride>
<NewPath>true</NewPath>
<DefaultUsernameClaim>preferred_username</DefaultUsernameClaim>
<DisableHttps>false</DisableHttps>
<DoNotValidateEndpoints>false</DoNotValidateEndpoints>
<DoNotValidateIssuerName>false</DoNotValidateIssuerName>
</PluginConfiguration>
</value>
</item>
</OidConfigs>
</PluginConfiguration>docker-compose.yaml
services:
jellyfin:
image: lscr.io/linuxserver/jellyfin:latest
container_name: media.domain.com
environment:
- TZ=America/Los_Angeles
- NVIDIA_VISIBLE_DEVICES=all
- NVIDIA_DRIVER_CAPABILITIES=all
volumes:
- ./config/:/config
- /shares/tv:/shares/tv:ro
- /shares/movies:/shares/movies:ro
ports:
- 8096:8096
restart: always
network_mode: bridge
deploy:
resources:
reservations:
devices:
- driver: nvidia
count: all
capabilities: [gpu]
Gitea
I wanted to set up my own github, so here is https://gitea.matt-cloud.com. It is linked to the Matt-Cloud SSO and everyone can login. I think most of my repos are viewable publicly. I share some of my more interesting playbooks here.

docker-compse.yaml
services:
gitea:
image: docker.gitea.com/gitea:1.24.2-rootless
container_name: gitea.domain.com
volumes:
- /media/docker/gitea/data:/var/lib/gitea
- ./gitea-config:/etc/gitea
- /etc/timezone:/etc/timezone:ro
- /etc/localtime:/etc/localtime:ro
ports:
- "3000:3000"
- "22:22"
restart: always
network_mode: bridgeapp.ini
APP_NAME = Gitea
RUN_USER = git
RUN_MODE = prod
WORK_PATH = /var/lib/gitea
[repository]
ROOT = /var/lib/gitea/git/repositories
[repository.local]
LOCAL_COPY_PATH = /tmp/gitea/local-repo
[repository.upload]
TEMP_PATH = /tmp/gitea/uploads
[server]
APP_DATA_PATH = /var/lib/gitea
SSH_DOMAIN = gitea.domain.com
HTTP_PORT = 3000
ROOT_URL = https://gitea.domain.com/
DISABLE_SSH = false
; In rootless gitea container only internal ssh server is supported
START_SSH_SERVER = true
SSH_PORT = 22
SSH_LISTEN_PORT = 22
BUILTIN_SSH_SERVER_USER = git
LFS_START_SERVER = true
DOMAIN = gitea.matt-cloud.com
LFS_JWT_SECRET = deadbeeflol
OFFLINE_MODE = true
[database]
PATH = /var/lib/gitea/data/gitea.db
DB_TYPE = sqlite3
HOST = localhost:3306
NAME = gitea
USER = root
PASSWD =
SCHEMA =
SSL_MODE = disable
LOG_SQL = false
[session]
PROVIDER_CONFIG = /var/lib/gitea/data/sessions
PROVIDER = file
[picture]
AVATAR_UPLOAD_PATH = /var/lib/gitea/data/avatars
REPOSITORY_AVATAR_UPLOAD_PATH = /var/lib/gitea/data/repo-avatars
[attachment]
PATH = /var/lib/gitea/data/attachments
[log]
ROOT_PATH = /var/lib/gitea/data/log
MODE = console
LEVEL = info
[security]
INSTALL_LOCK = true
SECRET_KEY =
REVERSE_PROXY_LIMIT = 1
REVERSE_PROXY_TRUSTED_PROXIES = *
INTERNAL_TOKEN = deadbeefloldeadbeefloldeadbeefloldeadbeefloldeadbeeflol
PASSWORD_HASH_ALGO = pbkdf2
[service]
DISABLE_REGISTRATION = false
REQUIRE_SIGNIN_VIEW = false
REGISTER_EMAIL_CONFIRM = false
ENABLE_NOTIFY_MAIL = true
ALLOW_ONLY_EXTERNAL_REGISTRATION = true
ENABLE_CAPTCHA = false
DEFAULT_KEEP_EMAIL_PRIVATE = false
DEFAULT_ALLOW_CREATE_ORGANIZATION = true
DEFAULT_ENABLE_TIMETRACKING = true
NO_REPLY_ADDRESS = matt-cloud.com
SHOW_REGISTRATION_BUTTON = false
ENABLE_PASSWORD_SIGNIN_FORM = false
ENABLE_BASIC_AUTHENTICATION = false
ENABLE_PASSKEY_AUTHENTICATION = false
[lfs]
PATH = /var/lib/gitea/git/lfs
[mailer]
ENABLED = true
SMTP_ADDR = mail.domain.net
SMTP_PORT = 465
PROTOCOL = smtps
FROM = gitea@domain.com
USER = gitea@domain.com
PASSWD = 'deadbeefloldeadbeefloldeadbeeflol'
[openid]
ENABLE_OPENID_SIGNIN = false
ENABLE_OPENID_SIGNUP = true
WHITELISTED_URIS = auth.domain.com
ENABLE_AUTO_REGISTRATION = true
ACCOUNT_LINKING = auto
USERNAME = preferred_username
[oauth2_client]
ENABLE_AUTO_REGISTRATION = true
ACCOUNT_LINKING = auto
[cron.update_checker]
ENABLED = false
[repository.pull-request]
DEFAULT_MERGE_STYLE = merge
[repository.signing]
DEFAULT_TRUST_MODEL = committer
[oauth2]
JWT_SECRET = deadbeefloldeadbeefloldeadbeefloldeadbeeflol
ENABLE_AUTO_REGISTRATION = true
ACCOUNT_LINKING = auto
USERNAME = preferred_username
authelia config
# OIDC Portion - domain is unsecured otherwise
- id: gitea-oidc
client_id: gitea-oidc
client_name: "gitea-oidc"
description: gitea-oidc
secret: 'deadbeefloldeadbeefloldeadbeefloldeadbeeflol'
sector_identifier: 'auth.domain.com'
public: false
response_types:
- 'code'
authorization_policy: one_factor
consent_mode: implicit
pre_configured_consent_duration: 6m
audience: []
scopes:
- openid
- groups
- email
- profile
redirect_uris:
- https://gitea.domain.com
- https://gitea.domain.com/user/oauth2/matt-cloud/callback
access_token_signed_response_alg: 'none'
userinfo_signing_algorithm: none
token_endpoint_auth_method: 'client_secret_basic'Proxy Server
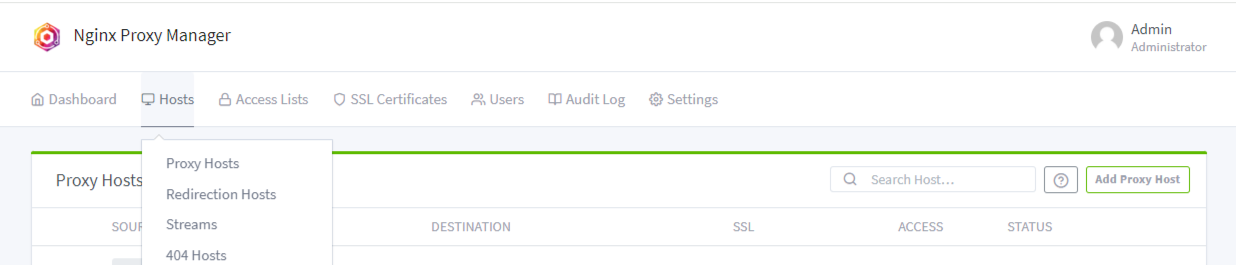
The proxy server is how I am able to host an indefinite amount of different things all from the same IP address. Thanks to the arcane magic lain down by the elders before me, one can make a DNS request, and when received by a certain type of server, said server is able to provide a different service based on the incoming DNS request. The proxy server I use is creatively called Nginx Proxy Manager, or NPM. This also allows me to use LetsEncrypt to create valid HTTPS certs and ideally auto renew them. The only major services I have that get their own VM and IP are Drive and Mail, so they don't go through this proxy. The proxy is also the only container with ports directly exposed to the internet, everything else is routed internally on the VM. As of the writing of this sentence, there are 56 different ports exposed internally from my different containers.
Home page items for NPM
Sample NPM config entry

Docker compose config
docker-compose.yaml
services:
nginx-proxy:
image: jc21/nginx-proxy-manager:latest
container_name: nginx-proxy
restart: always
ports:
# port 80 & 443 need to be bound on the IP where the firewall will point to
- "80:80"
- "443:443"
# port 81 is the web dashboard for NPM, you can proxy this using itself
- "81:81"
volumes:
- ./npm_data:/data
- ./npm_letsencrypt:/etc/letsencrypt
network_mode: bridgePhoto Album
I am pretty happy with the clever solution I came up with for the photo album. This uses seafile to populate the photo directory, and then pigallery to build the album. This allows you to maintain a folder on your desktop with all your photos on it, and then sync that with seafile, and then seafile syncs it again on the server. I have naturally redacted any passwords or personalization from it, but this setup is how my photo album works.
docker-compose.yaml
services:
seafile-client:
restart: always
image: gronis/seafile-client
container_name: sfcd
environment:
- TZ=America/Los_Angeles
- LIBRARY_ID=[set to seafile library ID]
- SERVER_URL=[set to seafile server URL]
- SERVER_PORT=[set to server port]
- USERNAME=[set to seafile username]
- PASSWORD=[set to seafile password]
- DATA_DIR=/media/photos
volumes:
- ./photos:/media/photos
pigallery2:
image: bpatrik/pigallery2:latest
container_name: photo-gallery
environment:
- TZ=America/Los_Angeles
- NODE_ENV=production # set to 'debug' for full debug logging
volumes:
- "./config:/app/data/config"
- "./db:/app/data/db"
- "./photos/Photo_Archive:/app/data/images:ro" #This folder depends on your seafile structure
- "./tmp:/app/data/tmp"
ports:
- 80:80
restart: alwaysNetwork Infrastructure
All this shit is depreciated, read it at your peril cause damn.
--Old Word Salad--
My network starts with pfSense installed on a mini PC hooked up to my /29 with comcast business. This is in the living room because that's where the coax comes in. The firewall is unsurprisingly connected to a switch; this switch is managed and has a single 10gb fiber port. I also keep my physical ADDC+DNS+DHCP+WDS server next to all this stuff. Naturally the fiber on this switch is for the link back to the bedroom that is my office with the big servers and my main desktop area in it. There are two more switches in here, the main one is the counterpart to the one in the living room and has two of those 10gb ports. The other 10gb port is for the main compute server, Saturn. Since this is both a file server and a VM server I wanted the pipe to be dummy thicc. The other switch is just a small 5 port managed switch screwed to my computer desk for.... reasons. I've also got some Unifi WAPs, two WiFi 5 APs in alternate corners of my apartment, and a WiFi 6 AP right in the middle. Have I noticed a difference with WiFi 6? Nah, it's barely enough to justify the cabling it took to mount it. The physical server runs windows server 2022 and hyperv, and has several storage locations. I have a separate NAS for the two large ZFS protected volumes as well. The NAS has dual xeon and 128GB of RAM on the compute side, and the two ZFS pools come to 30TB and 10TB. The 30TB volume is my general file server volume, containing among other things all my movies and TV shows, years of archived stuff of all varieties, software, ISOs, and literally etc. The 10TB volume is at this point just for Matt Drive. Right now I have a 8TB VHD provisioned for Matt Drive, and I can always expand that if it ever comes to that. I also have just recently installed physically in Saturn some drives that are used with the backup server. These are just a stripe, but I am using windows storage spaces for it, so I'll see how that goes. So far the performance has been good, but that's what a pure stripe will do for you. I also have a couple of NVMe's on Saturn for the VHDs of the VMs.